How to Take a Screenshot on a Mac?
![]() Written by Karolina Peistariene on
Written by Karolina Peistariene on
How to Take a Screenshot on Mac?
The 'Print Screen' feature is well known among Windows OS users since keyboards have a button with an associated label. If you are a new Mac user, you might not be aware of this feature, but it will enable you to capture a screenshot of the entire screen or any window within it.

To make keyboards look simpler, Apple decided to manufacture keyboards without a dedicated Print Screen key (and other dedicated keys). Despite this, a combination of simple key presses will invoke the exact function you are looking for. The combinations (six available) are easy to remember and deliver more options when choosing the type of screen capture you prefer.
Video showing How to Take a Screenshot on Mac.
Table of Contents:
- Introduction
- How to capture the screen to a specific file on the desktop?
- How to capture screen to Mac's Clipboard?
- How to change the location where screen images are being saved?
- Timed screenshots.
- Screenshot troubleshooting.
- Video showing How to Take a Screenshot on Mac.
How to capture the screen to a specific file on the desktop?
A screenshot in the Mac OS takes a 'picture' of your screen, a portion of it, or the active window. This is automatically saved to a unique file on your Mac desktop (unless you have changed the destination folder where screenshots are saved).
We describe how to change the destination folder below. We will use the Command and Shift buttons for each type of screen capture to execute a function, followed by a number or another key.
Command, Shift, and the number 4 capture a custom area selected by your mouse or touchpad when left-clicking and dragging to select a preferred area. When dragging, you will see figures near the mouse pointer, which are the pixel dimensions of your selected box. Before you drag, the coordinates of the start of the selection are displayed.
Command + Shift + 4 + space bar combination capture a specific window. When you click the space bar, your mouse pointer changes to a 'mini camera'.Ddrag it to your preferred window and left-click it.
The Mac automatically saves screenshots to a unique file, thus saving you unnecessary steps (you would otherwise have to paste images to export as files). It also allows you to save your screen images onto a Clipboard (as Windows does by default).
How to capture screen to Mac's Clipboard?
Saving screen images directly to the clipboard is useful when you do not need to store the image as a file. For example, if you want to send the screenshot via third-party apps. To save screen capture to the clipboard, the combinations similar to those used to save them to a file, just add the Control button. We repeat the combinations here:
Hold down Command + Control + Shift + 3. This command will take a screenshot of the entire screen and save it to the clipboard (you can then paste it anywhere).
Use the Command + Control + Shift + 4 combination to select a specific area, which will be saved to your clipboard. When dragging, you will see small figures near the mouse pointer, which are the dimensions of your selected box in pixels. Before you start to drag, you will see the coordinates where you are starting the selection.
If you want to save the active window image, use the combination of Command + Control + Shift + 4, but before left-clicking the mouse, push the space bar - your pointer will change into a 'mini camera'. Then click your preferred window.
Note: if you own an older Mac, your keyboard command key might have an Apple logo. Also, entire screen images will capture all displays if you use multiple monitors (in which case, the rectangular drawn box method or specific window does not apply).
How to change the location where screen images are being saved?
By default, your Mac will save screenshots to your desktop with the filename (including the date it was created). This can be changed by following some easy tips - all you need to know is the path of your desired folder.
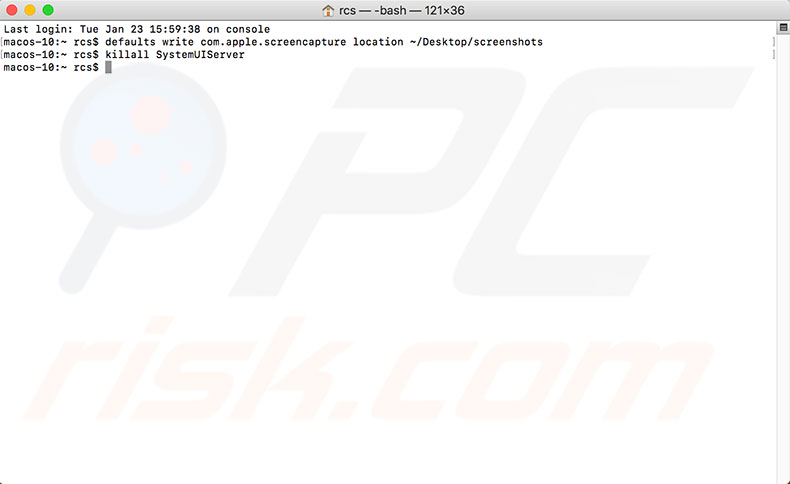
1. To change your destination folder, open Terminal, which is listed under Utilities in the Application folder.
2. Type the command: defaults write com.apple.screencapture location ~/Desktop/screenshots - screenshots are the folder for screen captures (use a path to your desired folder).
3. Press the Return key.
4. Next, type: killall SystemUIServer and click Return.
Take a few screenshots to check where your images are being saved.
Timed screenshots.
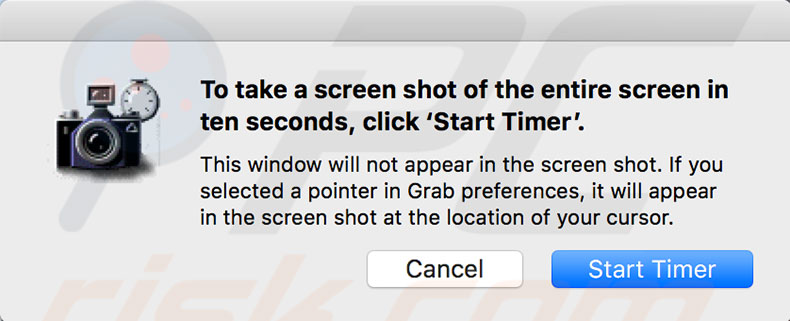
If simple screen capturing functions are not powerful enough for you, you might wish to try the Grab application, which you can find under Utilities in the Application folder. This app has some improved screen-capturing functions, one of which is delayed screenshots.
When you launch Grab at the top menu, you will see options for regular screenshots (such as small selection, the entire screen, or specific window), but there is also a function called timed screen that allows you to choose a time period after which it will take a screen picture.
Screenshot troubleshooting.
Taking screenshots on a Mac is quite simple, and in most cases, works perfectly. Unfortunately, even these easy tasks can fail. You might follow the above instructions/key combinations exactly and see a blank, white image. In most cases, the screen is blocked by the software you are trying to capture.
For example, Apple DVD player software blocks for reasons of copyright. Of course, there are alternatives to solve this issue - you can use a third-party DVD player or third-party screenshot software to avoid blocking issues.

▼ Show Discussion