Mac Can't Connect to Wi-Fi, How to Fix?
![]() Written by Karolina Peistariene on
Written by Karolina Peistariene on
Mac Can't Connect to a Wi-Fi Network, or Connection is Slow and Unstable - How to Fix?
Today, Wi-Fi networks are found in most homes where computers and mobile devices are used. It's also available in public areas such as cafes, hotels, airports, etc. Wi-Fi connections are used for personal use and are well integrated into various other systems, such as security cameras and yard lighting. Since Wi-Fi is widely used, a lost or weak signal can be very frustrating.
There are three main causes of Wi-Fi network issues: 1) router errors; 2) the Internet Service Provider [ISP] network is down or experiencing issues and; 3) problems with your device. There can also be issues with macOS software running on your computer. In this article, we describe some Wi-Fi network issues and possible solutions.
Table of Contents:
- Introduction
- Check your software compatibility
- Look up, if there are any Apple's WI-FI recommendations
- Contact your Internet service provider
- Reboot your Mac
- Reboot your router
- Forget and reattach your Wi-Fi network
- Check the location of your router
- Call Apple's Wireless Diagnostics to help you find out the problem
- Check for available competitors to your router
- Use the 5GHz band instead of 2.4GHz
- Run Apple Diagnostics
- Reset your Mac's SMC and PRAM or NVRAM
- Change the DNS settings for your network
Check your software compatibility
Some users have reported that the Wi-Fi problem appeared after upgrading their Macs. This particular problem has been widely encountered with Mac OS version El Capitan - once the update process finishes, issues with connecting to wireless networks occur.
Apple released an update for software to address the issue. However, MacBook Air owners still reported problems since, for many, a Wi-Fi network was the only available connection to the Internet. Apple product users found an option to access the update: share the connection from their mobile phones.
If this option is available to you, it might be worth trying, but bear in mind that cellular data restrictions will have a maximum available GB. Furthermore, Wi-Fi problems are sometimes encountered when computers run a beta version of macOS. For example, issues with frequent Wi-Fi dropouts while running High Sierra beta (but resolved in the 10.13.12 update).
Look up, if there are any Apple WI-FI recommendations
Since all modern versions of macOS include many troubleshooting tools, your computer will check for issues while attempting to connect to a Wi-Fi network. The recommendations are displayed in the Wi-Fi status menu, which can be accessed by clicking the Wi-Fi logo in the menu bar at the top right of the screen.
Contact your Internet service provider
Network issues might be the result of problems with your Internet Service Provider (ISP). In this frustrating case, the only option is to contact them or check 'network status' on their website to check if they encounter issues. Even if their servers are working well, there might be problems with cables. For example, if the network has an issue during bad weather, it might be caused by water on the cables.
Reboot your Mac
Resetting electronic devices is a good idea, and so this process is similar to the previous one.
1. Turn the Mac off, disconnect the power cable, and wait for 30 seconds.
2. Turn the computer on and check if the problem is solved.
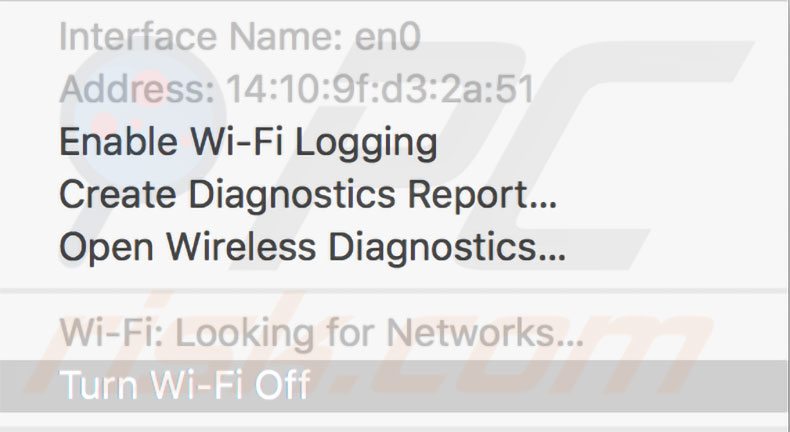
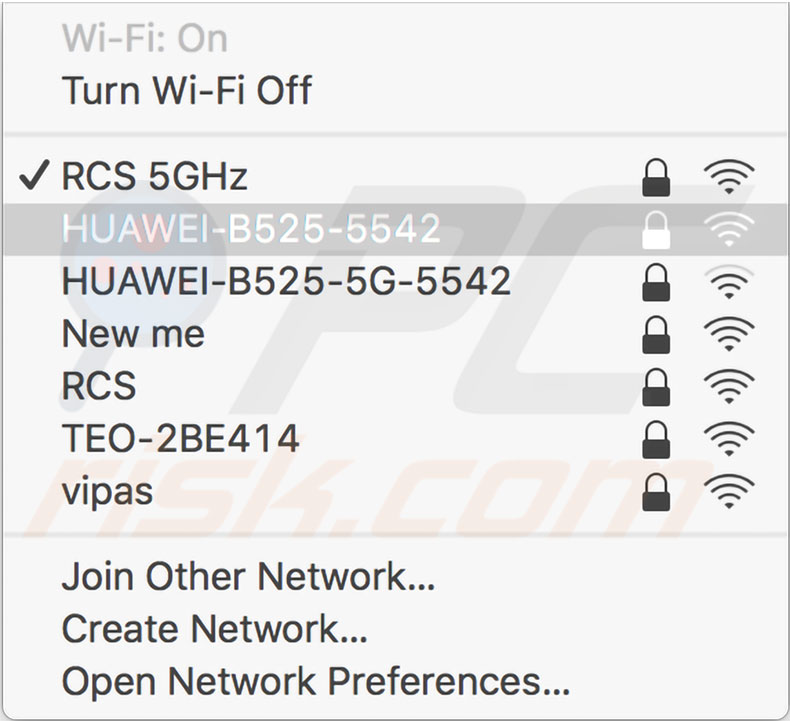
Otherwise, disable the Wi-Fi adapter and wait a few seconds before turning it back on - this will force the Mac to re-scan for available networks. To turn off the Wi-Fi, click the Wi-Fi logo in the menu bar at the top right of your screen and choose Turn Wi-Fi off.

Alternatively, try to disable Bluetooth. This might seem confusing, but users report that turning off Bluetooth solves network issues. To disable it, click the Bluetooth icon located next to the Wi-Fi icon and choose Turn Bluetooth off.

Reboot your router
As we all like our devices to connect automatically to a home network, routers often experience significant uptime. This can result in crashes since the demand outweighs its capacity
1. Disconnect the router from the power adapter and keep it in this state for about 30 seconds.
2. Then, reattach the power cord and turn it back on.
Keep the router cool
Electronic devices and components will not work if they exceed their maximum temperatures. Wi-Fi routers will fail if they are not covered or positioned to prevent excessive temperatures. Manufacturers include various protections against overheating (depending on the device), but most will simply stop working or decrease performance to the minimum.
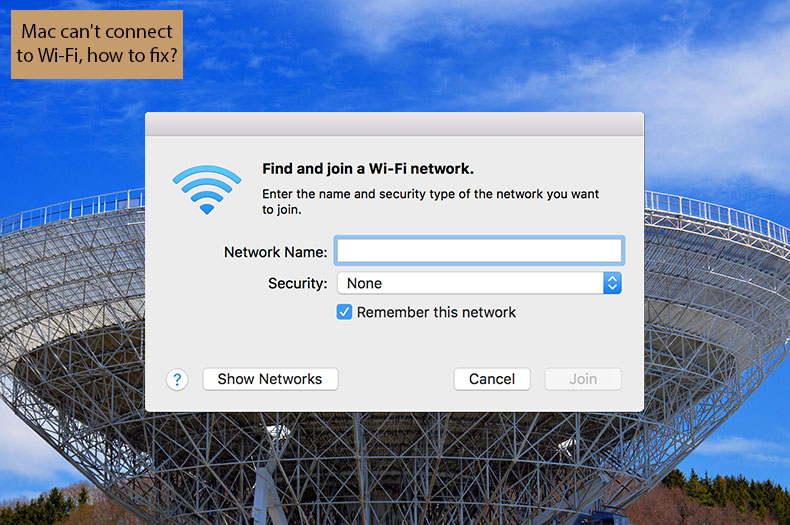
Forget and reattach your Wi-Fi network
Removing the existing network and performing a new connection sometimes solve erratic problems related to Wi-Fi network connections. The effect is similar to a router reset without managing the power source.
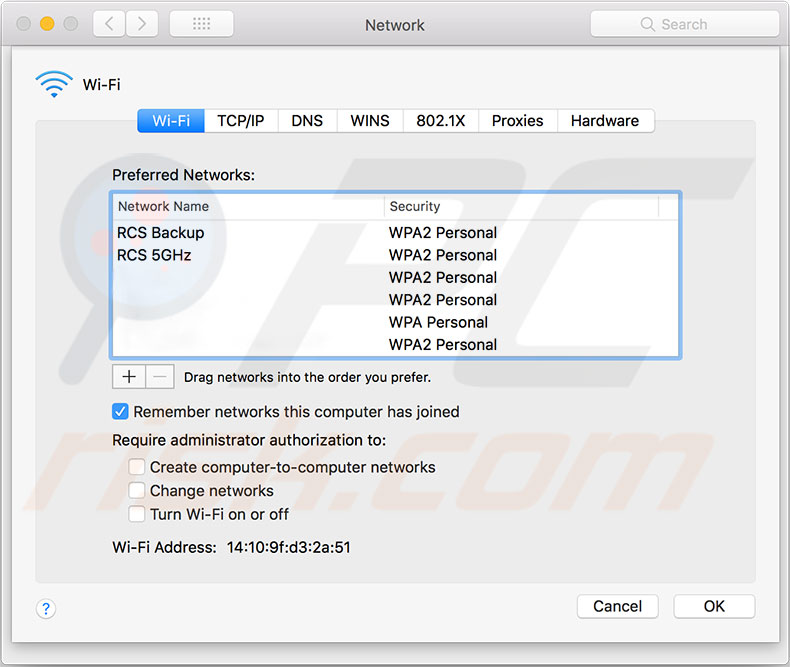
1. To forget a Wi-Fi network, open the Mac System Preferences and select Network.
2. In the new window, select your Wi-Fi network from the list on the left and then click Advanced.
3. You will see a list with all saved networks - select the problem network and click the remove (-) button.
4. Confirm your action by clicking Remove in the popped-up window.
5. Once you have removed a network from the preferred list, all Apple devices that use the same Apple ID and iCloud Keychain will not automatically connect to it. The last step is to connect to this particular network manually - select it from the list and enter the password when requested.
Check the location of your router
Since Wi-Fi routers are based on electronic waves, the location of the router might be a problem. When you position a router, avoid any large metal surfaces such as radiators or filing cabinets.
Another important factor is the distance between the computer and the source of electronic waves. Try to position the Mac (or another device) using the Wi-Fi network closer to the router. Check if this solves the issues.
Signal strength can be affected for several reasons. For example, thick walls concealing significant metal can result in 'dead spots' where the Wi-Fi signal is unreachable. Some third-party applications draw a map of a building's Wi-Fi signals.
These apps require you to move your computer through the building to inspect signal strength. If you find weak spots, you can obtain a Wi-Fi extender device that expands areas of the wireless signal. When you set up these devices, ensure that you change the SSID (Wi-Fi network name) and password to be identical to your router settings. This will allow your Mac to automatically switch between signals when it reaches a spot where the strength differs.
Otherwise, you will be asked to type in the password, and the connection will be lost until you confirm the action. Problems are sometimes caused by other electrical devices such as microwaves, fans, wireless phones, or motors. For example, the Wi-Fi connection is lost whenever you use a microwave oven. This is a result of microwave interference. In this case, move the router away from the microwave device, affecting the signal.
Call Apple's Wireless Diagnostics to locate the problem
Modern versions of macOS include many built-in diagnostic tools, including those relating to Wi-Fi networks. You can launch the Wireless Diagnostics application, which displays three graphs of signal performance. It also checks for possible issues with your network and/or Wi-Fi adapter.
1. To generate performance graphs, launch the tool using Spotlight or hold down Option and click the Wi-Fi icon in the menu bar at the top right of the screen.
2. Then select Open Wireless Diagnostics.
3. Before you launch the tool by clicking Continue, click on Window in the menu at the top of the screen and select Performance. Alternatively, you may use the keyboard shortcut of Option, Command, and 5.
4. This will display three graphs of transmission rate, signal quality, and signal and noise levels. Inspecting these graphs might allow you to identify issues.
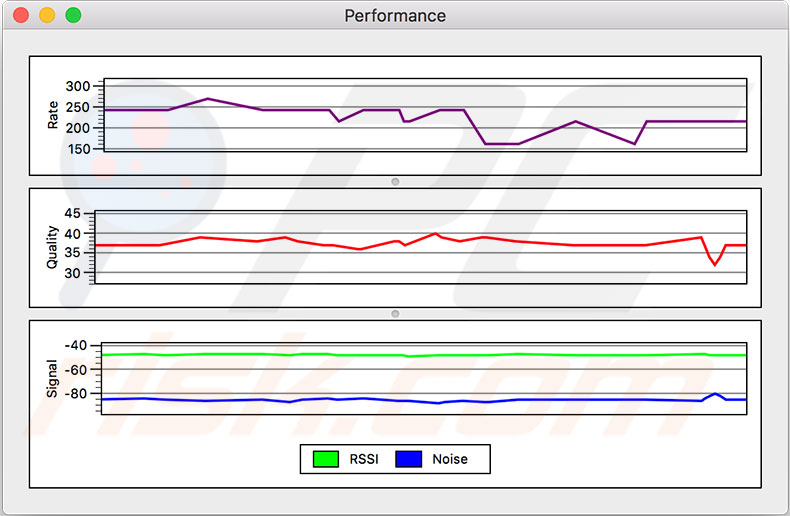
The top graph monitors the data rate of your Wi-Fi network in Mbps. Stats are taken from the router and other equipment connected to it. To troubleshoot problems, you must monitor the rate. Any dips, or a complete drop-off, will indicate an issue.

The middle graph displays the signal-to-noise ratio over time - it should be a straight line, possibly with small spikes. If you notice frequent dips in the line or a complete drop-off, something interferes with your Wi-Fi signal. Using this graph, you can locate a problematic device by process of elimination. For example, turn on a microwave oven and check the graph for possible drops.

The last graph, labeled Signal, displays two lines. The top is signal strength, and the bottom measures noise. Both stats are shown as dBm (Decibel to milliwatts), a commonly used unit for quantifying the ratio between two values - in this case, signal to noise.
A good signal should have a strength of between -60 and -10 dBm, and the noise level should be below -75dBm. In other words, the smaller gap between the lines, the worse the Wi-Fi signal. Even the position of the router can affect the strength and noise level. Therefore, try to change both the vertical and horizontal positions of the device.

Check for available competitors to your router
One of the most common issues experienced when several Wi-Fi networks within the same building are the interference of waves. Separate routers might possibly use the same channel. To find out about used channels and other related information, Wireless Diagnostics can help. The Scan function, accessible through the Window menu at the top left of the screen, displays all detectable networks.
Routers usually succeed in automatically selecting proper channels. However, if you are experiencing issues, inspecting and manually changing the channel might solve the problem. The path to router settings depends on the software, which can be accessed by entering the router IP address through a web browser.
Most routers have an IP address of http://192.168.0.1 or http://192.168.1.1, or sometimes http://192.168.1.254. In the router software, look for channel information, log in if required, and change it. Do not choose 'next available' - skip at least five or seven channels since their frequencies overlap.
Note that narrowband uses five channels simultaneously, while wideband routers use seven. We recommend that you monitor the graphs within the Wireless Diagnostics tool to choose a channel that offers the best performance.
Use the 5GHz band instead of 2.4GHz
The channels described above relate to the 2.4GHz band. If the methods did not fix the wireless issues, switch to the 5GHz band. The 5GHz band is less susceptible to interference since other domestic devices do not use that frequency. It also offers more bandwidth as compared to 2.4GHz.
Unfortunately, this option is available only for dual-band routers. If you use Apple products, AirPort Extreme and Time Capsule offer this feature. First, you must separate the 2.4GHz and 5GHz networks on the router and give them different names.
1. For Apple devices, this can be performed in the AirPort Utility application under the Wireless tab.
2. Click the Wireless Options button at the bottom of the window, enable the checkbox beside the 5GHz network name, and set a different name to the other band.
Finally, set the Mac and iOS devices to join the 5GHz network rather than 2.4GHz. On a macOS:
1. Go to System Preferences and select Network.
2. Choose Wi-Fi network and click Advanced.
3. Drag the 5GHz network to the top of the preferred networks list.
On an iOS device:
1. Open Settings and tap on Wi-Fi.
2. Next, tap on the blue 'i' in the circle beside the 2.4GHz network name and toggle Auto-Join off.
3. Finish by connecting manually to the 5GHz network.
Run Apple Diagnostics
If none of the steps above solve the Wi-Fi network issues, use Apple Diagnostics to check for existing troubles on the Wireless adapter or network.
1. To use this tool, first disconnect all external devices, except the keyboard and screen.
2. Next, shut down the Mac and turn it back on, but hold down D on the keyboard when turning on.
3. Release the key when you see the window asking to select your language - select it and wait until the process finishes (this can take 2-3 minutes). If the tool detects any problems, they will be displayed on-screen together with suggested solutions.
Reset your Mac's SMC and PRAM or NVRAM
If you still struggle to solve wireless network problems, try resetting the Mac SMC (System Management Controller) and PRAM or NVRAM. Detailed steps here: how to reset Mac's SMC you will find in this step-by-step guide. Process: how to reset your computer's PRAM or NVRAM is described here.
Change the DNS settings for your network
Changing the DNS settings is a recommended method when dealing with network-related issues. This method may seem confusing, so follow the steps below. First, you must delete your Wi-Fi preference files, but we strongly recommend creating a copy before deleting it.
1. Begin by launching Finder.
2. Click on Go in the menu at the top of the screen and select Go To Folder.
3. Type the following destination: /Library/Preferences/SystemConfiguration/
4. Within this folder, look for the files listed below, drag them to a separate folder where you will store them:
com.apple.airport.preferences.plist
com.apple.network.identification.plist
com.apple.wifi.message-tracer.plist
NetworkInterfaces.plist
preferences.plist
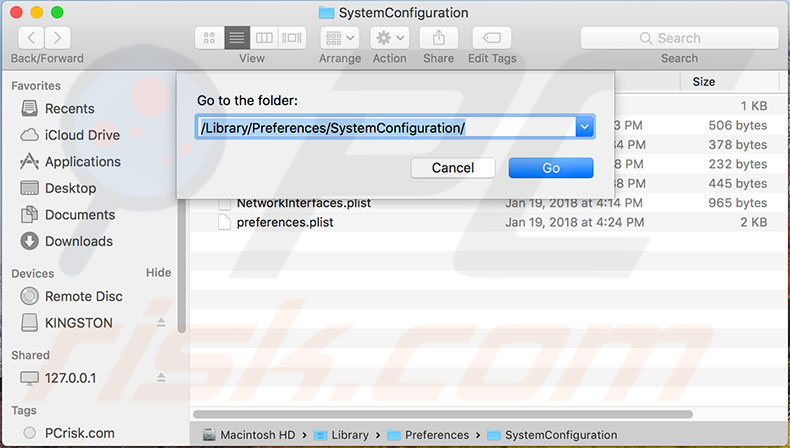
5. Next, restart the Mac and turn on Wi-Fi to check if the problem is solved.
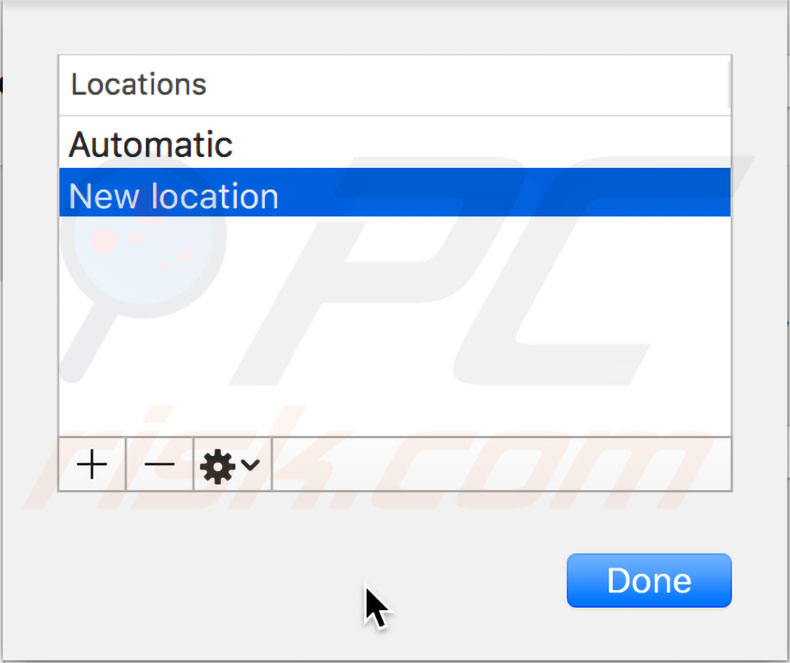
Otherwise, create a new Wi-Fi network location adding custom MTU and DNS details. Before adjusting these settings, close all applications that might be using the network.
1. When you have closed all apps, go to System Preferences and select Network.
2. Then click the wireless network and click the drop-down beside Location in the top center of the window.
3. Choose Edit Locations, click on add (+) to create a new location, and name it with something you can remember.
4. Finally, click Done.
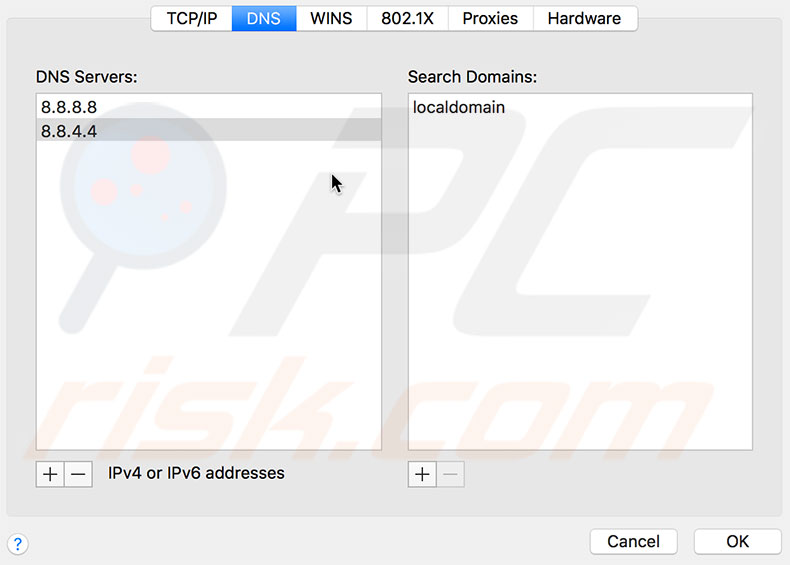
5. Next, join the Wi-Fi network using your usual router password. Click Advanced, select the TCP/IP tab and then click Renew DHCP Lease.
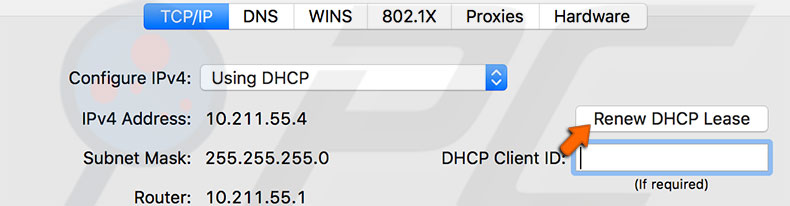
6. Go to the DNS tab and add 8.8.8.8 and 8.8.4.4 addresses to the DNS Servers list (those are Google's free DNS servers, but you can add any you prefer).
7. Next, choose the Hardware tab. In the drop-down menu next to Configure, select Manually.
8. Change MTU to Custom and set it to 1453, click OK, and confirm by clicking Apply.

If none of the methods above solved the wireless network issues, consider replacing the router.

▼ Show Discussion