How to Fix 'Another Device On the Network is Using Your Computer’s IP Address' Error?
![]() Written by Karolina Peistariene on
Written by Karolina Peistariene on
Mac Displays Error Message 'Another Device on the Network Is Using Your Computer's IP Address' After Awaking or Booting Up? Here's How to Fix!
Today, most computer users could not imagine working without Internet access, and the devices seem almost useless without it. Therefore, it is concerning when you turn on your computer (or 'awaken' it) and a warning message appears, stating that another device on the network is using your computer's IP address.
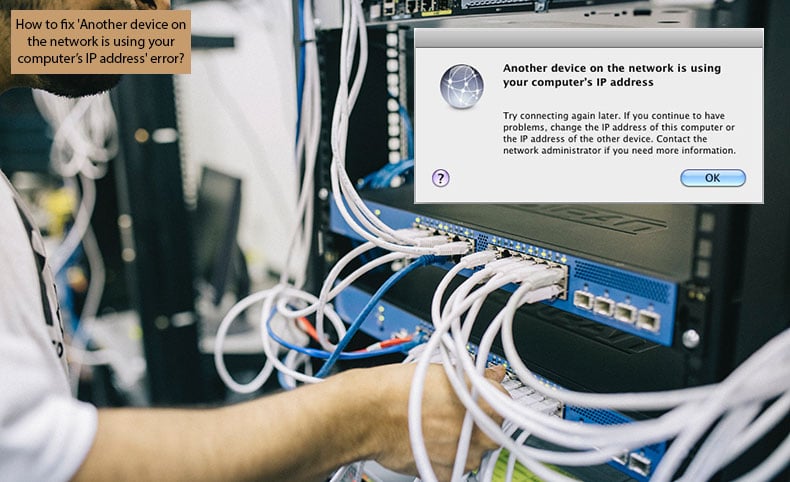
This problem is often caused by miscommunication between devices, routers, and the Dynamic Host Configuration Protocol (DHCP) server. The server attempted to assign an Internet Protocol (IP) address already in use with another device.
Another frequent cause is when your iOS device tries to use the same IP address that was previously assigned, and, subsequently, the address is assigned to another computer. From studying users' reports, we have discovered that this error often appears when turning on or 'awakening' the Mac.
The final (but unlikely) possibility is that someone has hacked into your network and 'spoofed' your Media Access Control (MAC) and IP addresses. In this article, we cover the most efficient ways to solve IP address conflict issues.
Video showing How to Fix 'Another Device On the Network is Using Your Computer's IP Address' Issue?
Table of Contents:
- Introduction
- Restart everything and reset the router
- Manually renew DHCP lease
- Manually set the IP addresses
- Spoofed Mac and IP addresses
- Video showing How to Fix 'Another Device On the Network is Using Your Computer's IP Address' Issue?
Restart everything and reset the router
First, restart all devices connected to the same network (computers, mobile devices, or TVs). Modern versions of operating systems often attempt to renew leases automatically. Therefore, they request a new, unused IP address from the DHCP server.
If restarting devices does not solve the issue, reset the Wi-Fi router. Some newer routers contain a Reset button, while older routers may require you to unplug them from the power source.
Manually renew the DHCP lease
If restarts and automatic lease renewal do not solve the problem, manually renew leases on all devices. On Mac computers, you can renew leases by two separate methods. Via Terminal using ipconfig tool and by visiting Network Preferences under System Preferences.
Renew DHCP Lease on macOS:
1. Click the Apple logo in the menu bar at the top of the screen, select System Preferences, and choose Network pane.
2. Select your current network and click the Advanced button.
3. Then select the TCP/IP tab, where you will find a button called Renew DHCP Lease. When you click this button, the numbers beside IPv4 Address should update.

To update the DHCP Lease via the command line:
1. Launch Terminal via Spotlight using the keyboard shortcut of Command and Spacebar.
2. Type Terminal, then press Return.
Alternatively, you can launch Terminal through Finder - simply launch Finder go to the Applications folder. Then open Utilities and launch the command line application.
3. Once Terminal is launched, type the following command by choosing the proper interface address. en0 usually is the default Wi-Fi interface, while en1 is associated with the Ethernet connection.
sudo ipconfig set en0 DHCP
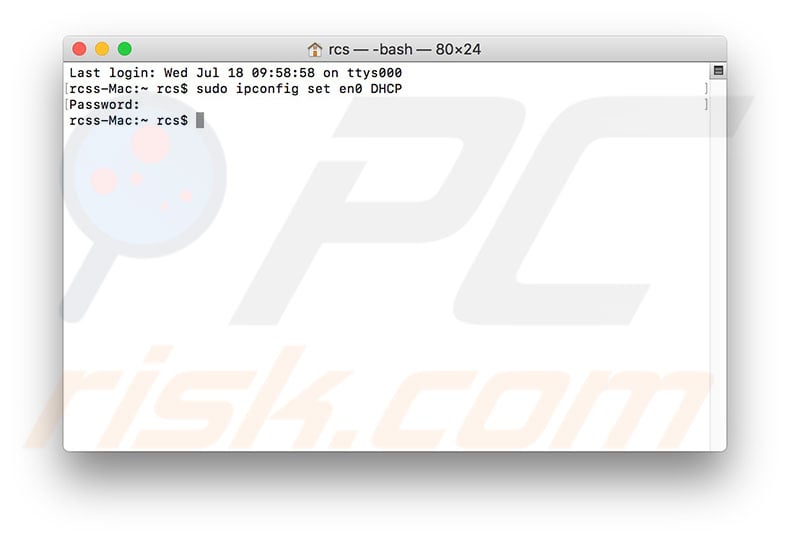
If you are unsure which interface to choose (en0 or en1), try to retrieve information about the interface using the following command.
ipconfig getpacket en0
4. When the command executes successfully, Terminal should display results including DHCP server information, client IP address, lease time, subnet mask, router IP address, and DNS servers.
Renew DHCP lease on the iOS device:
Visit your iOS device settings, choose Wi-Fi, and then tap the Information (i) button on the network you are connected to. At the bottom of the screen, you will find the Renew DHCP Lease option. The IP address should update when the leases are renewed (the last three digits will change).
Manually set the IP addresses
If the methods above did not solve your IP addresses conflict issue, another and probably the most efficient method is to set the static IP addresses to each device manually. In this way, you will be sure that no devices are using the same IP address.
Set static IP on macOS:
1. Go to System Preferences by clicking on the Apple logo in the menu bar at the top of your screen, then select System Preferences.
2. Open the Network pane and select your current network connection.
3. Click Advanced in the bottom right corner and choose the TCP/IP tab.
4. In the drop-down menu beside Configure IPv4, select Using DHCP with manual address or Manually.
5. Next, enter the IP address. If you use an earlier version of OS X, you will probably need to enter the Subnet Mask and router IP address. If you do not know all of these required details, contact your network administrator to ask for the proper assigned IP, subnet mask, and router address.
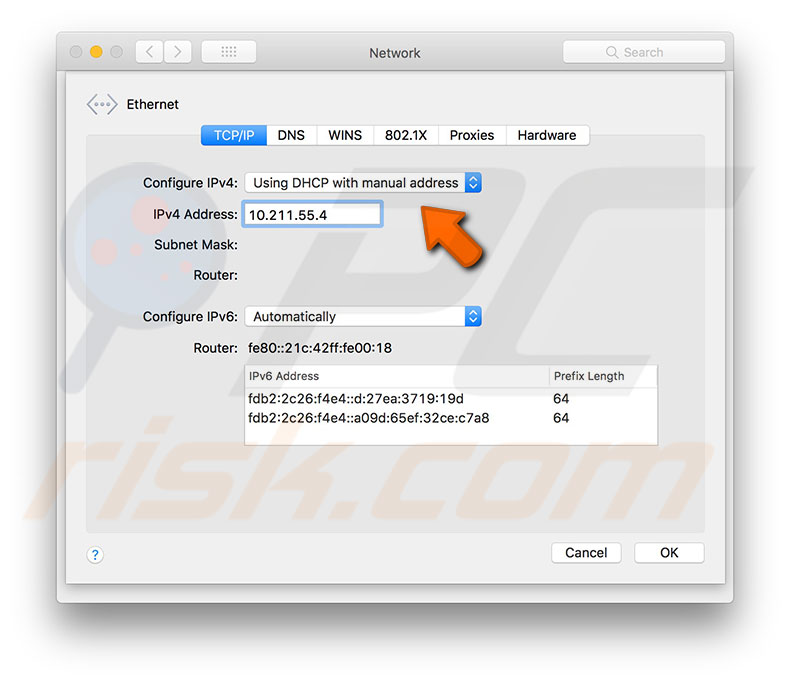
To correctly choose an IP address for your computer, you must set the address that differs enough from those already used. If there is more than one device within a network, the IP addresses are assigned sequentially - the first IP address belongs to the router, and the following are assigned to devices.
For example, if there are five devices within the same network and the router's IP address is 10.0.1.1, the addresses from 10.0.1.2 to 10.0.1.7 will usually be allocated to existing devices. Leaving 10 or 20 addresses unused will prevent IP addresses conflicts.
6. Once all required fields are entered, click OK and save changes by clicking Apply.
Set static IP on the iOS device:
1. Open the mobile device's settings, tap on Wi-Fi, look for the network you are connected to, and tap on the information (i) icon.
2. Inside, expand the Configure IP section and choose Manual.
3. Fill in the IP address, Subnet Mask, and Router IP address. If you do not know all of these required details, contact your network administrator to ask for the proper assigned IP, subnet mask, and router address.
4. Finally, tap Save.
On earlier iOS versions, choose the Static tab, and complete the network information, including DNS server address.
Spoofed Mac and IP addresses
Finally, the most threatening cause of this problem is that someone has 'spoofed' your Mac and IP addresses and hides within the same network. This might also cause the error message stating that another device on the network is using your computer's IP address.
This is unlikely since most routers use security protocols. Also, spoofing the Mac and IP addresses is not as easy as setting a static IP (as was described above). Furthermore, the DHCP leases automatically renew whenever you restart your computer, thus deeming the spoofed addresses useless. Therefore, spoofing is unlikely to work and would simply be a waste of time.

▼ Show Discussion