How to Fix Windows 10 Search Not Working
![]() Written by Rimvydas Iliavicius on
Written by Rimvydas Iliavicius on
How to Fix Windows 10 Search Not Working
Windows Search is a Windows service that allows users to find and search for files on their computers quickly. Unfortunately, this feature may stop working. This article contains several methods to fix this issue.

There's no doubt that Windows Search is a helpful feature. Type a keyword or two, and it will reveal not only file and data results but also web links, Windows tools, and settings. This can be useful if you wish to find and open a specific Windows setting or tool with a single click.
There is no need to look for a particular setting manually or go through several different windows to find a file using Windows Search. The same can be said about typing manually since you can also use Cortana, the voice-recognition assistant. If it is more convenient for you to use voice search, the results will be the same as typing.
Despite these advantages, operating systems are not perfect, and users often face problems when using Microsoft Windows. Windows Search might not work correctly or not work at all. In this article, we show several methods to fix this type of problem.
Since it can be difficult to ascertain what causes these problems, you may need to try a number of the methods outlined below.
Video Showing How to Fix Windows Search Not Working
Table of Contents:
- Introduction
- Restart File Explorer
- Restart Cortana
- Check Windows Search Service
- Run Windows Troubleshooter
- Re-register Cortana Using PowerShell
- Restore Indexing Service
- Restore Your System Using Restore Points
- Video Showing How to Fix Windows Search Not Working
Restart File Explorer
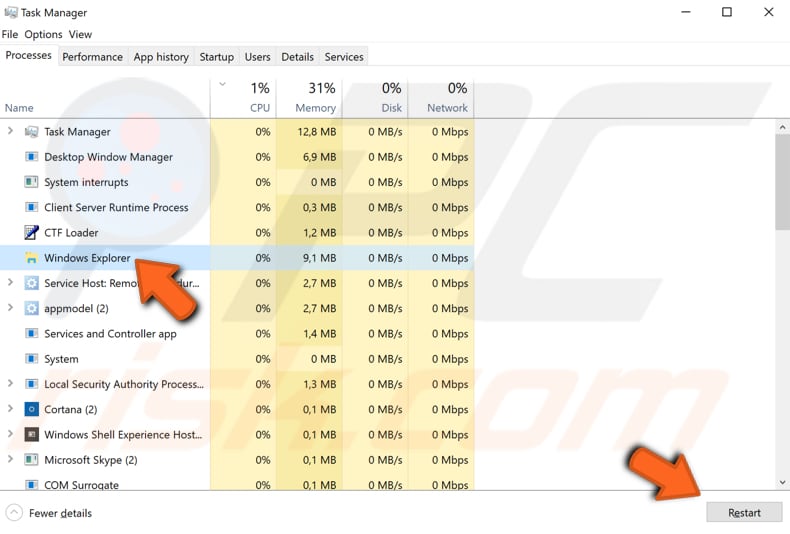
Restarting File Explorer might get Windows Search working properly. To restart File Explorer (Windows Explorer), open Task Manager by pressing the Ctrl + Shift + Esc keys on the keyboard or right-click Start menu and select Task Manager from the contextual menu.
Once Task Manager is open, find "Windows Explorer" under the "Processes" tab and select it. Then locate the "Restart" button in the bottom-right corner and click it. File Explorer will be restarted, and Windows Search should work.
Restart Cortana
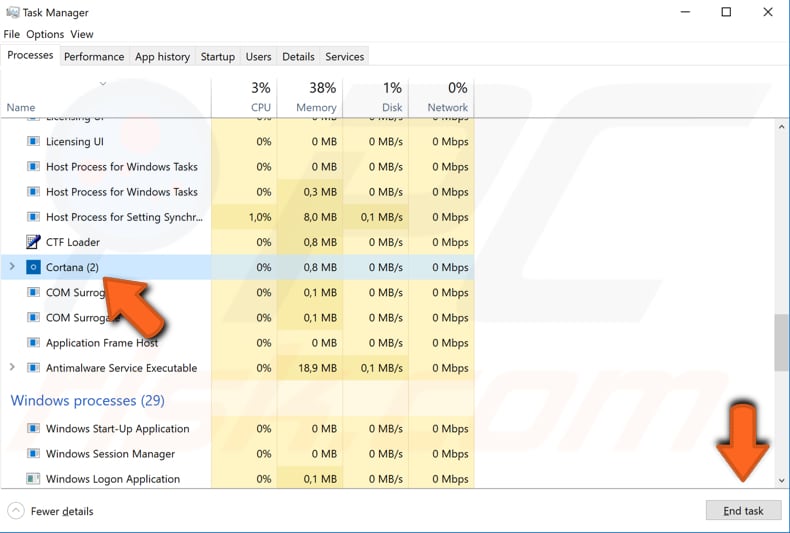
To restart Cortana, go to Task Manager by pressing Ctrl + Shift + Esc keys on the keyboard or right-click Start menu and select Task Manager from the contextual menu.
Once Task Manager is open, find the Cortana process under the Processes tab and click the "End task" button in the bottom-right corner.
Alternatively, right-click the Cortana process and select "End task" from the contextual menu. This will restart the Cortana process - check if Windows Search now works properly.
Check Windows Search Service
Windows Services (also know as services.msc) are used to modify how Windows services run on your system. These services are responsible for running available programs and managing many system settings and resources.
You can modify a service's settings for security, troubleshooting, and performance-related reasons. Windows Search might not be working because the Windows Search service is not running or not enabled.
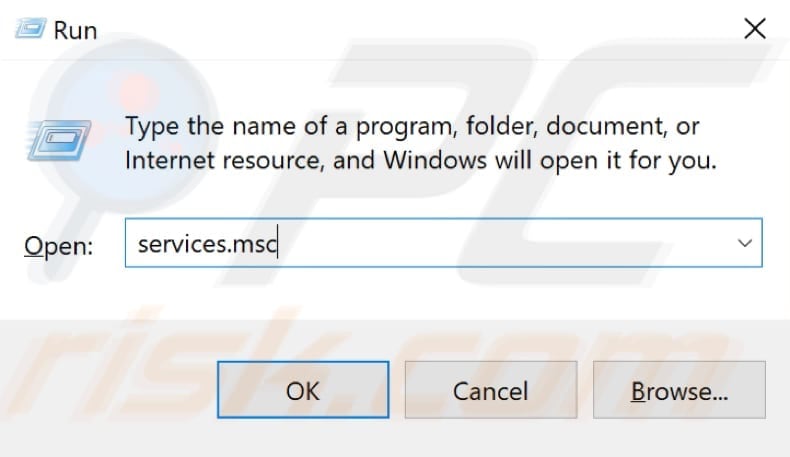
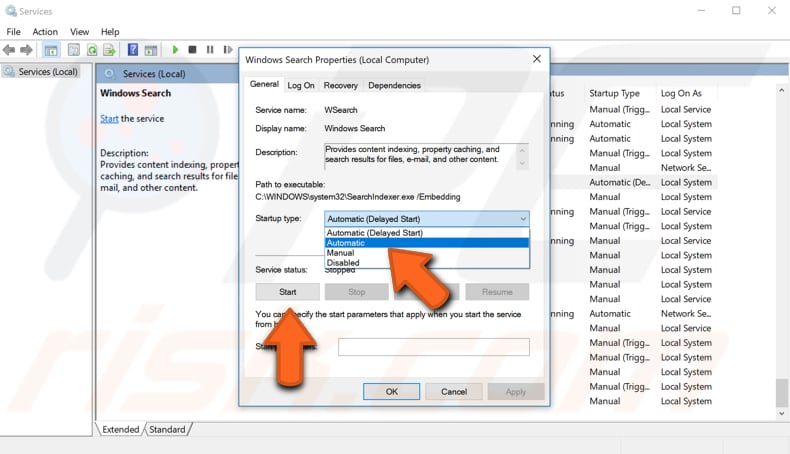
To access the Windows Search service, press Win key + R to open the Run dialog box. Once the Run dialog box is open, type "services.msc" and click "OK", or press Enter on the keyboard.
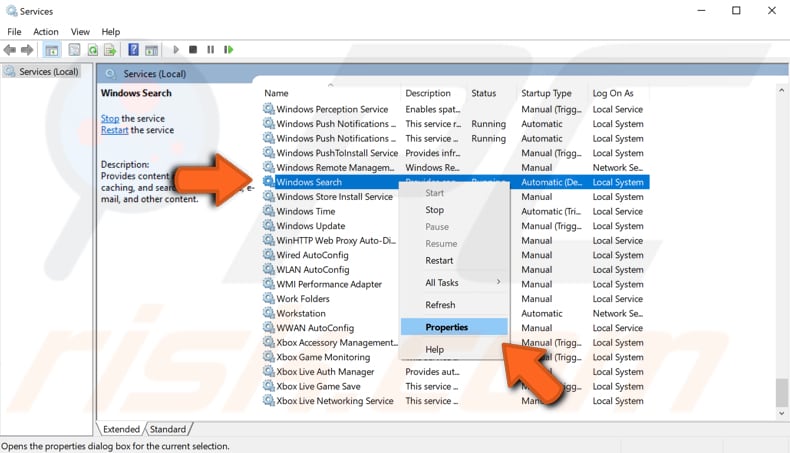
In the Services window, you will see a list of local services. Scroll down to find "Windows Search" and right-click it. Select "Properties" from the drop-down menu to open the service's properties.
In the Windows Search Properties window, click "Start" to start this service (if it has stopped) and ensure that the "Startup type" is set to "Automatic". By doing this, you will direct the Windows operating system to start the Windows Search service on every Windows startup. Click "Apply" to save the changes made and "OK" to exit.
You can also right-click the Windows Search service (in the Windows Services window) and select "Restart" from the contextual menu. See if the Windows Search is now working properly.
Run Windows Troubleshooter
The built-in Windows troubleshooter can solve (or at least identify) most problems that can occur when using Windows 10.
To start troubleshooting, go to Settings and type "troubleshoot", and then select "Troubleshoot" from the list.

Now, scroll down to find "Search and Indexing" under "Find and fix other problems" and click it, and then click "Run the troubleshooter".
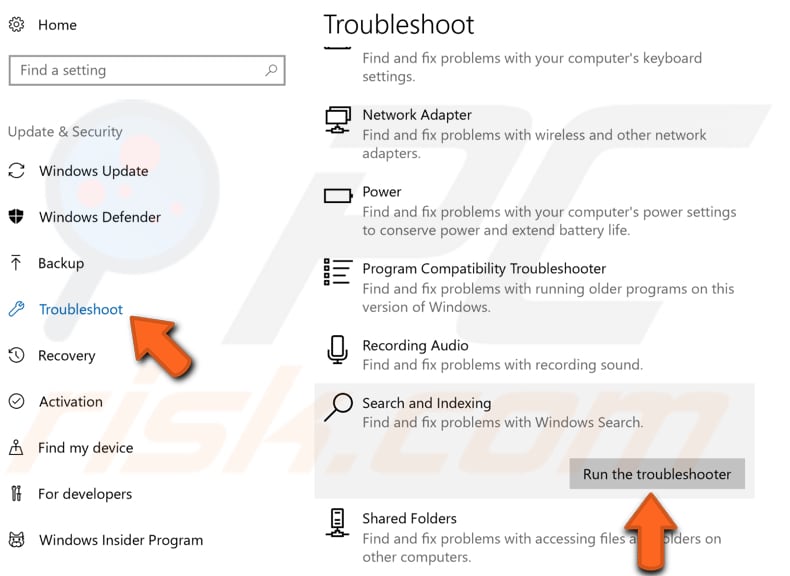
Windows troubleshooter will ask, "What problems do you notice?" Mark the "Files don't appear in search results" and "Search or indexing is slowing down the computer" checkboxes and click "Next" to start troubleshooting. See if this fixes the problem with Windows Search.

Re-register Cortana Using PowerShell
PowerShell is a task automation and configuration management framework from Microsoft, consisting of a command-line shell and associated scripting language. In PowerShell, administrative tasks are generally performed by "cmdlets", which are specialized .NET classes implementing a particular operation.
You can access PowerShell by right-clicking on the Start icon in Windows and selecting the "Windows PowerShell (Admin)" result.

Now copy the "Get-AppxPackage Microsoft.Windows.Cortana | Foreach {Add-AppxPackage -DisableDevelopmentMode -Register "$($_.InstallLocation)\AppXManifest.xml"}" command and paste it into the PowerShell window.
To paste it, simply right-click on the Powershell background, and the command will appear - press Enter to execute this command. Close PowerShell and see if this fixes Windows Search and it is working properly.

Restore Indexing Service
Indexing service (now known as Windows Search indexer) is a Windows service created to improve search performance on Windows computers. If Windows Search stops working properly or stops working completely, restoring this service might help fix the problem.
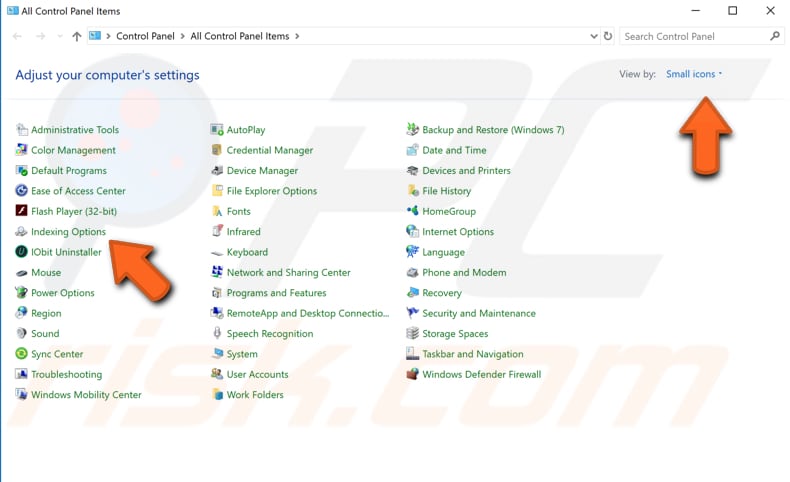
To restore the Windows Search indexer, go to Control Panel and find "Indexing Options". If it does not appear, ensure that the Control Panel view is set to "Small icons".
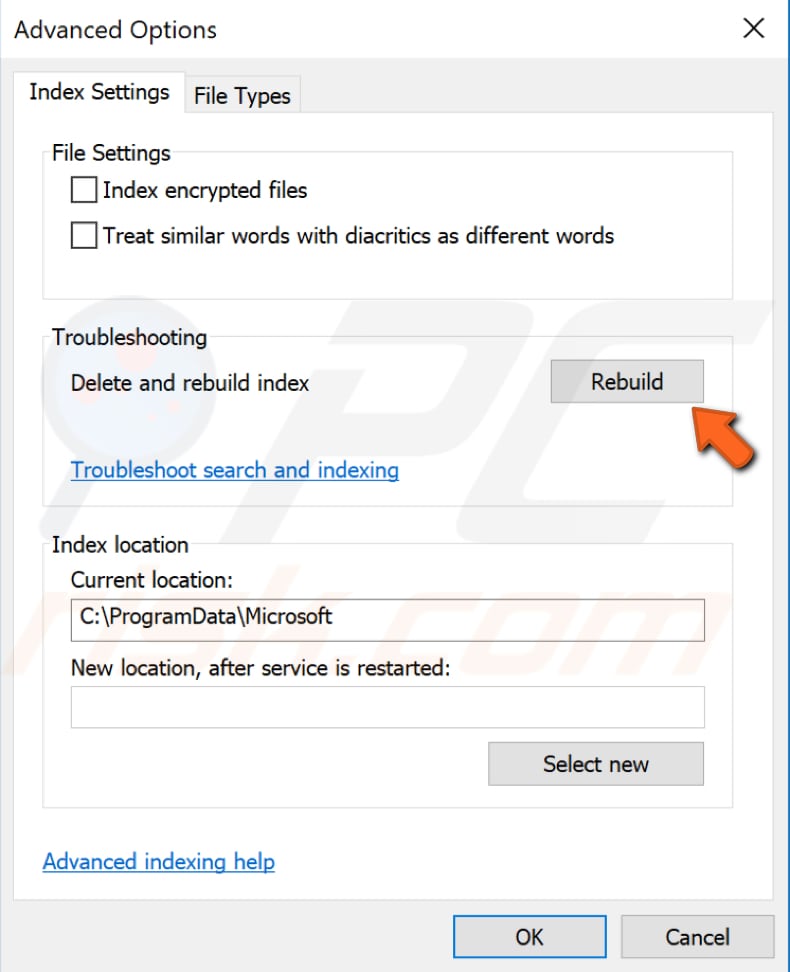
In the Indexing Options window, click the "Advanced" button.

In the "Index Settings" tab, find the "Rebuild" button under Troubleshooting and click it. This will display a notification saying that rebuilding the index might take some time to complete and that some views and search results might be incomplete until rebuilding has finished.
The amount of time required to finish this process will depends on the system speed. If you have an older or slower computer, it might take much longer to complete. Click "OK" to start rebuilding the index.
Restore Your System Using Restore Points
If none of the methods mentioned above fixed the problem with Windows Search, you can try to restore the Windows operating system to a previous state at which the problem with Windows Search was not present.
The System Restore tool creates restore points. A restore point is a collection of important system files stored by System Restore on a given date and time. System Restore reverts everything to a saved restore point, but first, you must have one recorded.
If a restore point does not exist on your computer, System Restore has nothing to revert to. To use this tool, you must have previously created restore points. With a created restore point, this feature will bring your system back to the previous working state, without affecting your files and data.
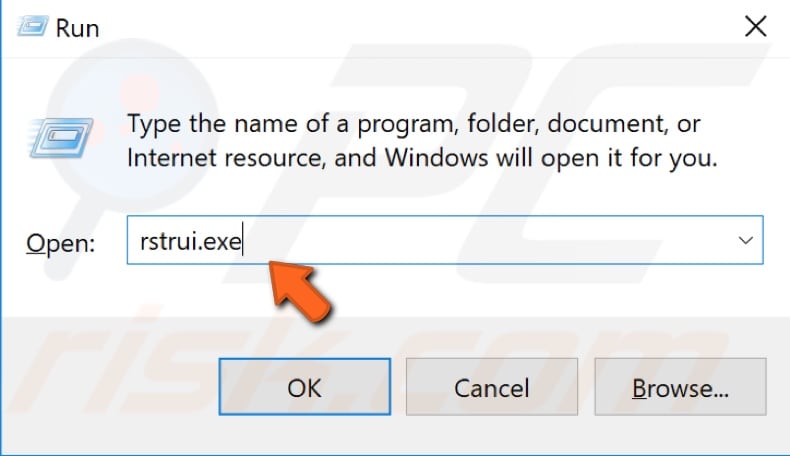
To restore your system, launch Run. To start it, press the Windows Key + R and type "rstrui.exe". In the Run dialog box, press Enter or click "OK".
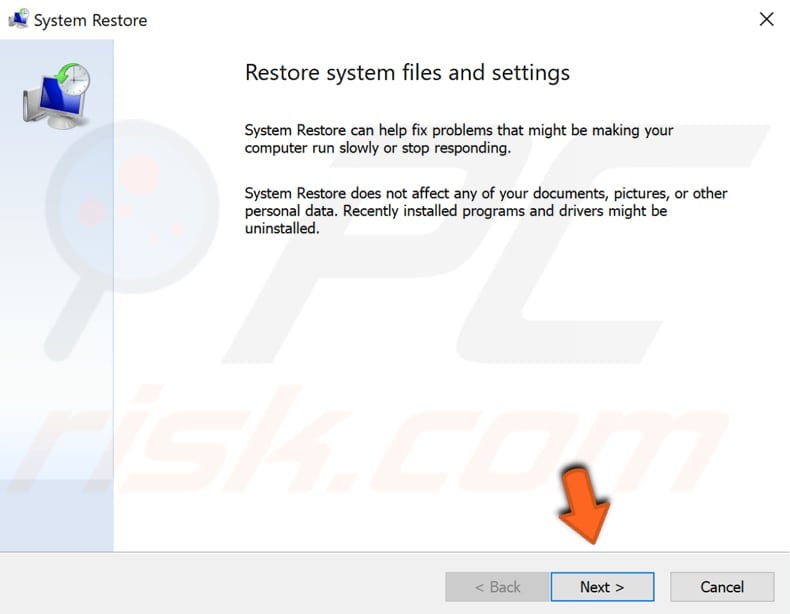
In the System Restore window, click "Next".
If there are restore points created, you will see a list of them. Mark the "Show more restore points" checkbox - this should display more restore points. Select the most appropriate restore point (depending on the time created, etc.) and click "Next".
Do not select a Restore Point at a time when the Windows Search problem was already present.

Confirm the restore point. Your computer will be restored to the state before the event detailed in the "Description" field.
If you are happy with your choice, click "Finish" and begin the system restore process.

We hope that this article was helpful and you were able to fix your Windows 10 search not working problem.

▼ Show Discussion