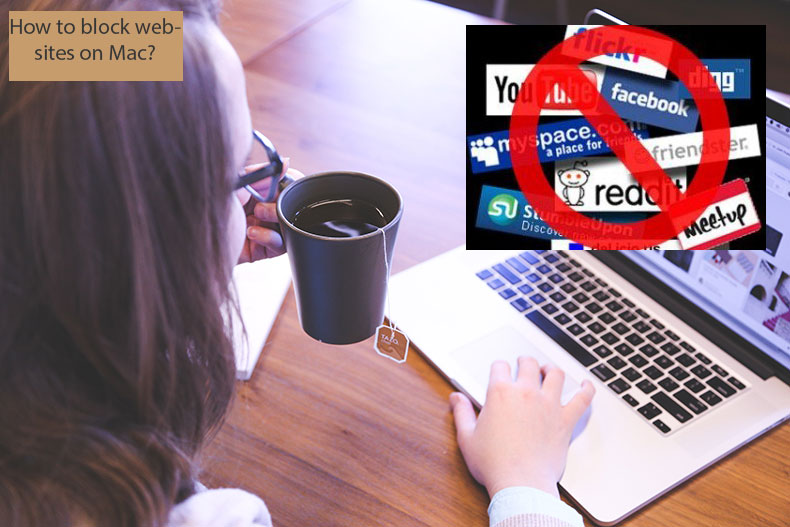
How to Block Websites on Mac?
![]() Written by Karolina Peistariene on
Written by Karolina Peistariene on
How to Block the Desired Websites on Mac and Safari?
Today, the Internet is overflowing with malicious and offensive content. Many parents seek to prevent children from seeing these websites, and blocking them is one of the best options. You may also want to block certain content at your workplace to ensure that employees stay focused and productive.
The easiest way to control access to content is to set parental controls on children's or employees' accounts. However, this is not always possible. For example, setting restrictions on an administrator account is not straightforward. Fortunately, there are other options to control content.
You can block certain content using third-party applications that work as website blockers and screen-monitoring software. A more advanced option would be configuring the host file to block connections to websites included in a 'black list'. In this article, we will cover all three methods to block and unblock websites on Mac computers.
Video showing How to Block Websites on Mac Safari?
Table of Contents:
- Introduction
- Set website restrictions via Parental Controls
- Block websites by modifying the Hosts file
- How to block a website on a mobile device
- Video showing How to Block Websites on Mac Safari?
Set website restrictions via Parental Controls
We start with the simplest method: set parental controls for the existing account or create a new restricted account.
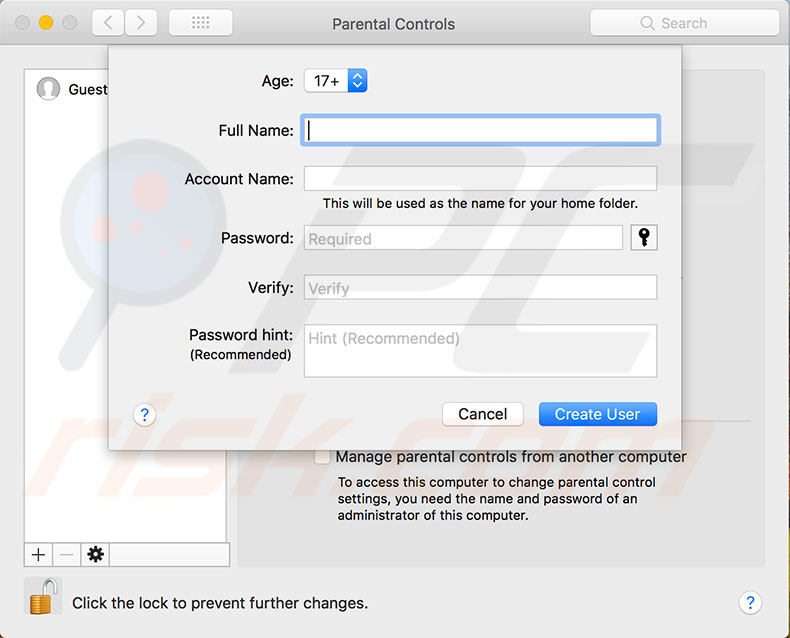
1. Open Mac System Preferences and then choose Parental Controls. If you do not have an account without administrator permissions, Parental Controls allows you to create a new restricted user account or convert your existing administrator's account.
2. You are advised to create a new account for your children - select Create a new user account with parental controls and click Continue.
3. In the next window, complete the form with the new account details (bear in mind that a hint will be useful if you ever lose or forgot your password).
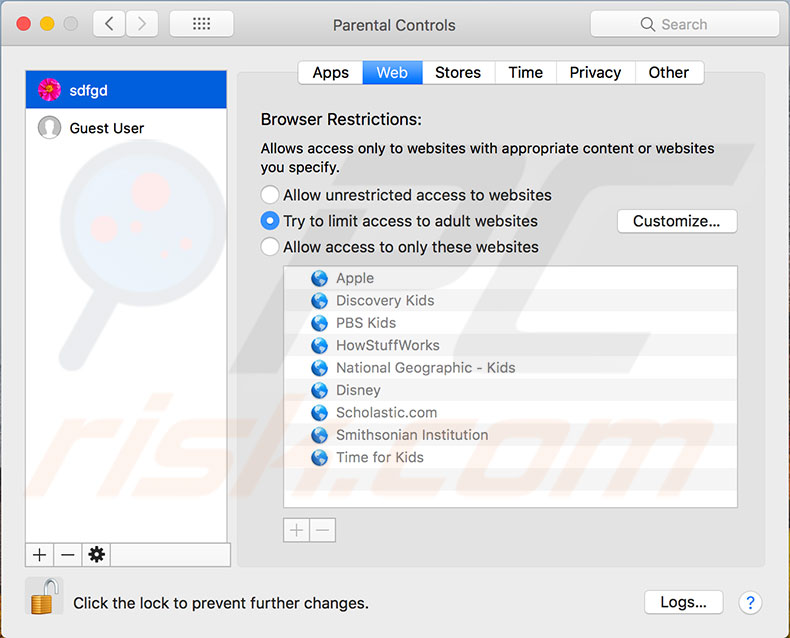
4. Once you have created a new account, select it from the list on the left side of the window. This will allow you to set restrictions for applications available with this particular account. Also, to set a time when this account can be used on the computer.
5. To set website restrictions, choose the Web tab (or Content in earlier versions of the Mac operating system). You will see three options:
Allow unrestricted access to websites.
Try to limit access to adult websites. This will attempt to block all websites recognized as containing adult content. Essentially, it looks for matches under Apple's list of adult content. The Customize... button to the right of this option allows you to add or remove specific websites - in this way, you can be sure that content is blocked (or, if needed, accessible at any time).
Allow access to only these websites. This option is the most restrictive since it only allows access to websites contained in the list and blocks all others.
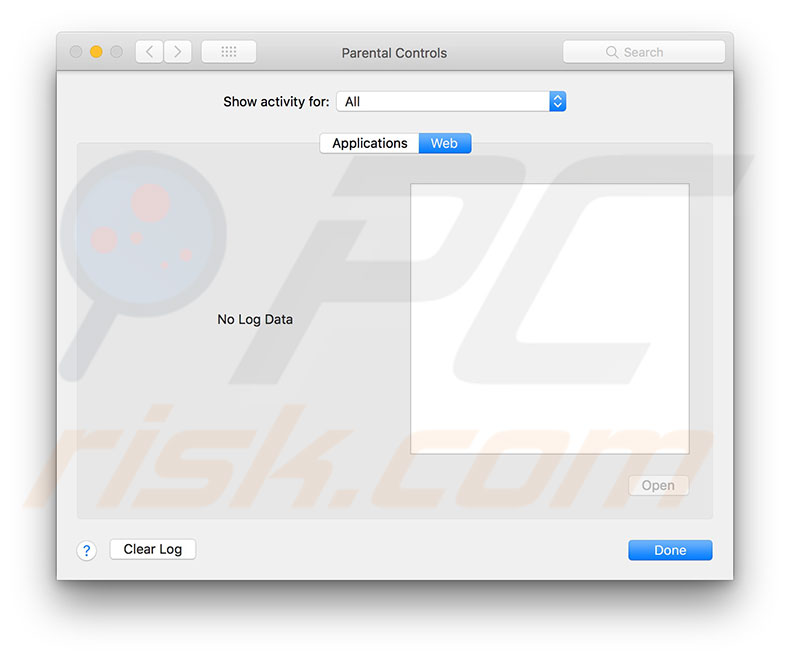
The last helpful feature under the Web tab is the Logs... button. This displays information about recent activity relating to websites accessed on this particular account. You can choose a period you want to check via the drop-down menu beside Show Activity.
Block websites by modifying the Hosts file
This method requires the use of the command line and some specific commands. There are cases when this technique does not work at all. However, the advantage of this method is that you will also block websites on administrator accounts.
1. Launch the Terminal application by using Spotlight. Simply use the Command and Spacebar keyboard shortcut, or go to the Utilities folder under Application through Finder.
If you mistake when editing the host's file, you might run into a situation whereby no websites are loaded. To prevent any unexpected scenarios, create a backup copy before modifying the host's file. This will allow you to recover the host's file to the previous version.
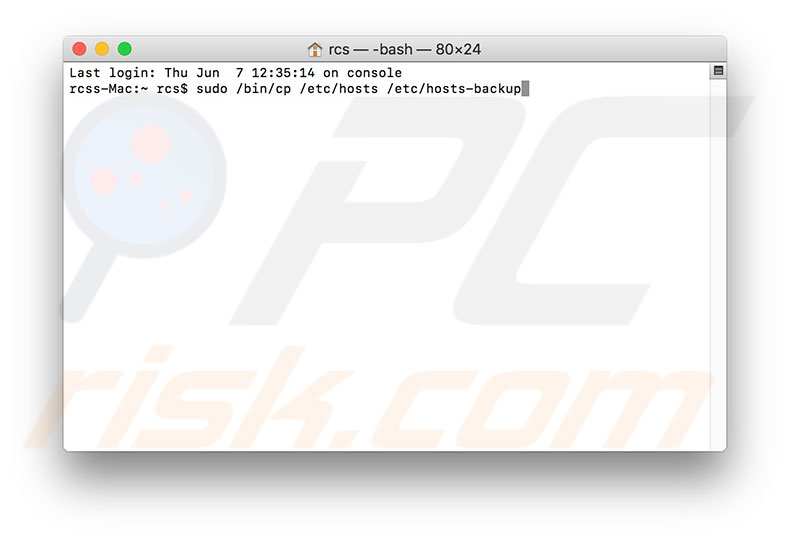
2. Type the following command and press Return:
sudo /bin/cp /etc/hosts /etc/hosts-backup
3. The Terminal will ask you to confirm your actions with an administrator accounts password since you are using superuser permissions.
4. Once you have created the backup, open the hosts file by entering the command listed below. The new text editor window will prompt:
sudo /Applications/TextEdit.app/Contents/MacOS/TextEdit /etc/hosts
Alternatively, you can use the following command to the edit hosts file through the Terminal application rather than the text editor:
sudo nano -e /etc/hosts
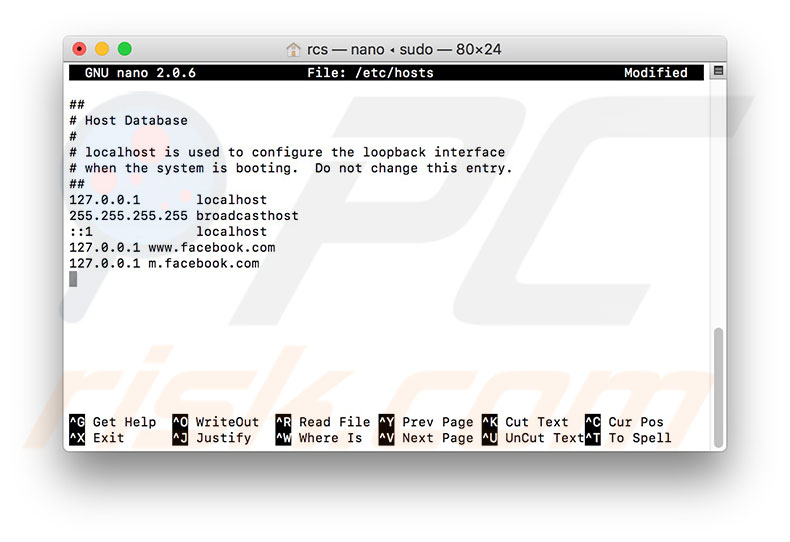
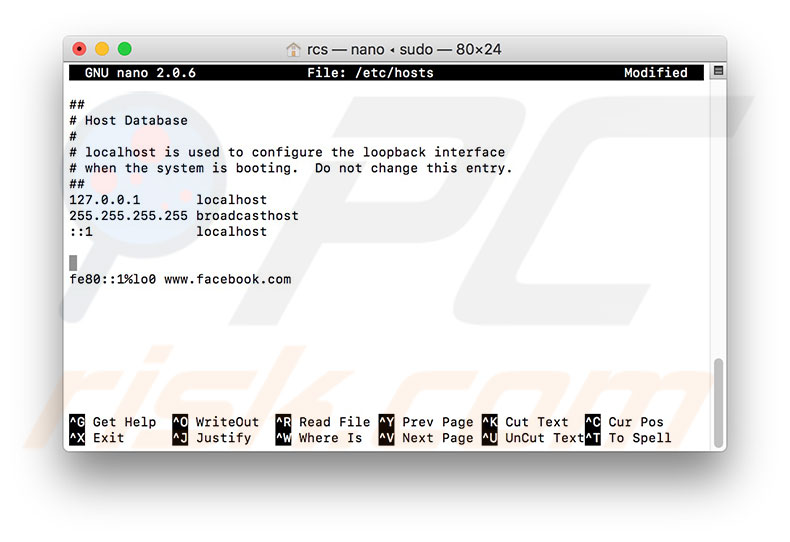
The hosts file usually contains IP addresses and additional information - leave this and attach new data below it. Some people had reported that this method worked only when the new data was attached above the existing information, but we recommend that you start by adding new data below.
5. Begin by entering the 127.0.0.1 IP address - this is a local IP address. Whenever a web browser is directed to this address, it will not reach the web page.
6. Next, press the Space bar and add the URL address (e.g., www.facebook.com) of the website you wish to block
You do not need to add the attribute of the protocol (such as http:// or https://). The hosts file only checks for the exact URL of the address you enter. For example, if you enter 'google.com', only the home page of the Google website will be blocked.
All other pages, such as translate.google.com, maps.google.com, etc., will work if you enter these addresses directly. Note that you must type the addresses manually since copying URLs can include invisible characters that could result in problems when the Mac attempts to connect using information from the hosts file.
To add more than one website to block, separate them with a new line - i.e., type each address in a new line starting with the local IP address followed by the URL address. In theory, you can add multiple website addresses within one line. Still, you cannot exceed the limit of 255 characters on one line (otherwise, the entire line might not work - on some versions of the Mac operating system, multiple URLs within one line will not work).
7. Once you have finished the list, close or quit the TextEditor window. A dialog box will prompt asking if you wish to save the modified file - choose to save.
8. If you were editing the hosts file through a Terminal window, press the keyboard shortcut of Control and O to save modifications and Control and X from closing the file.
9. Finally, flush the cache, which can be performed by typing the following command into Terminal:
dscacheutil -flushcache
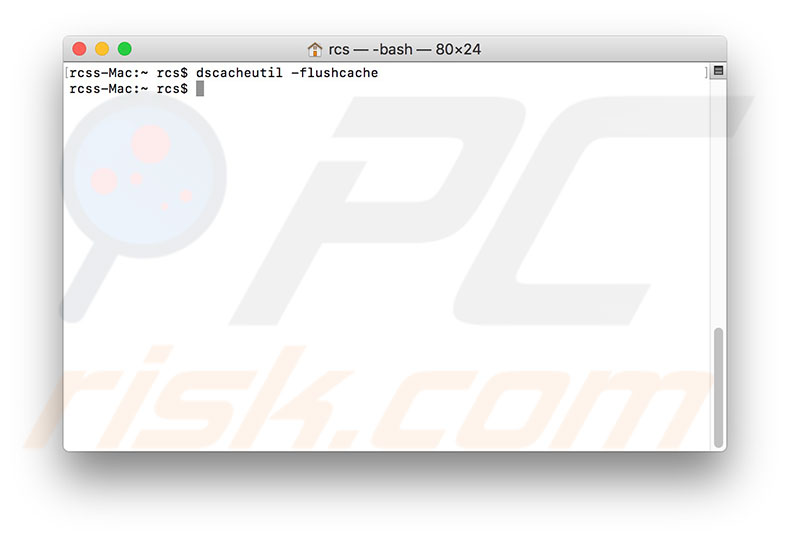
10. Execute this command by pressing Return on your keyboard. From this point, the websites stored in the hosts file will be blocked.
Alternatively, you can simply restart the Mac to flush the cache automatically. There is often no need to flush the cache to apply the modified hosts file. If you still have access to websites listed in the hosts file, this might result from different ways to connect to that particular website. Browsers sometimes access a different subdomain, connecting via an IPv6 address or simply bypassing the hosts file.
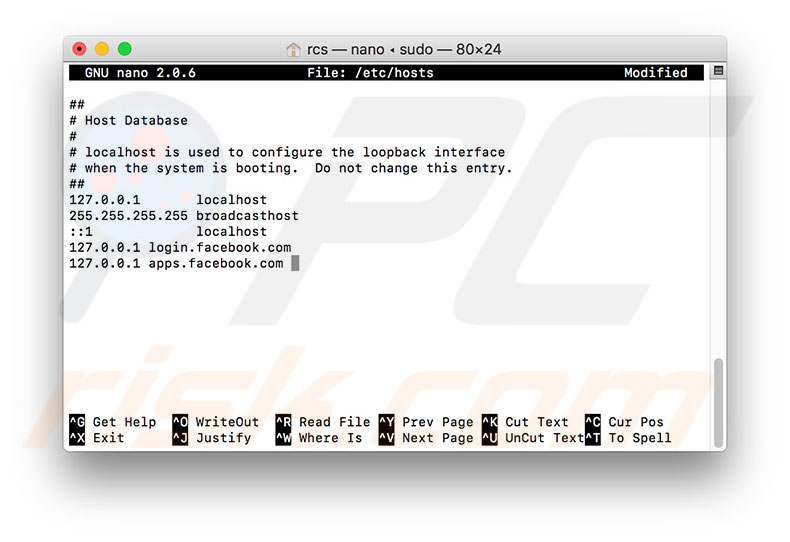
If you are experiencing a subdomain or IPv6 address problem, simply add additional information to the hosts file. Add the line with a local IP address (127.0.0.1) without the 'www'. Add the line with local IP address (127.0.0.1) and m.(URL) to block mobile versions of the site.
Some website homepages contain the 'login.' and 'apps.' attribute at the start - in these cases, the line should look like this: 127.0.0.1 login.(URL) or apps.(URL).
To block connections via IPv6 addresses, replace the local IP address with the following address 'fe80::1%lo0' and then type the URL address. Most websites do not use IPv6 connections. However, some do, including FaceBook. An example of how to block a connection via an IPv6 address is 'fe80::1%lo0 www.facebook.com'.
How to block a website on a mobile device
You can block websites on mobile Apple devices easily when using Safari as the web browser, and there is no need to use third-party applications to block all or specific websites. Mobile devices often contain similar options to the Parental Control application provided on Macs.
There are options to block all websites added to a 'black list'. You can also choose to block all websites with some exceptions - in other words, you can create a 'white list' of websites.
1. Start by opening the iPhone, iPad, or iPod Settings, and then tap on General.
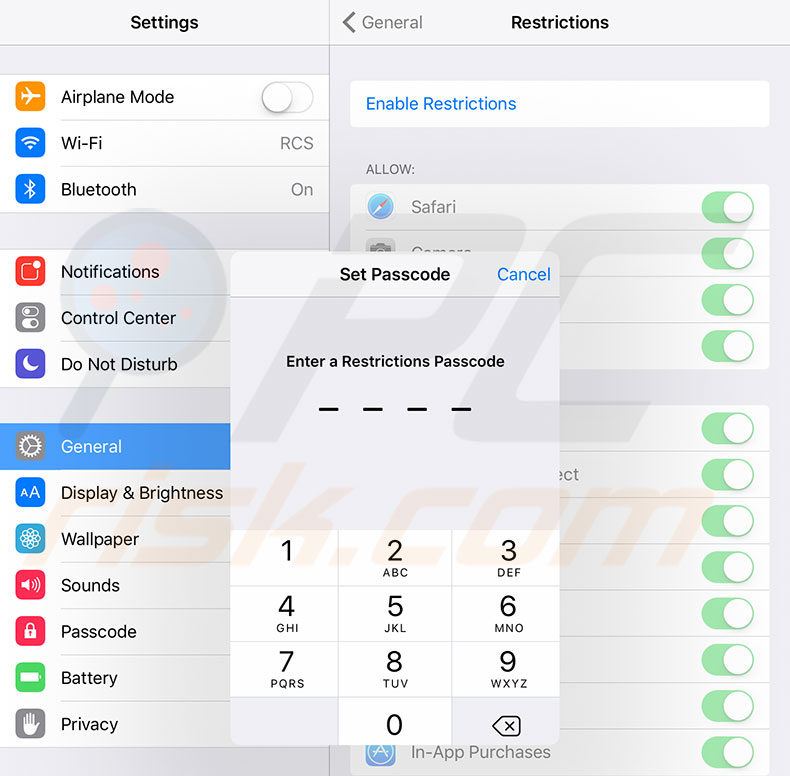
2. Find and select the Restrictions option to check all available settings. If this function is disabled, tap Enable Restrictions.
3. Your mobile device will ask you to enter a four-digit password used to manage restrictions on that particular device. Enter a combination known only to you or someone you trust. If the password is easy to guess, the people you wish to restrict on certain websites will be able to use the password to modify the blocking list.
4. You will be asked to repeat the password to confirm, and finally, the password will be created.
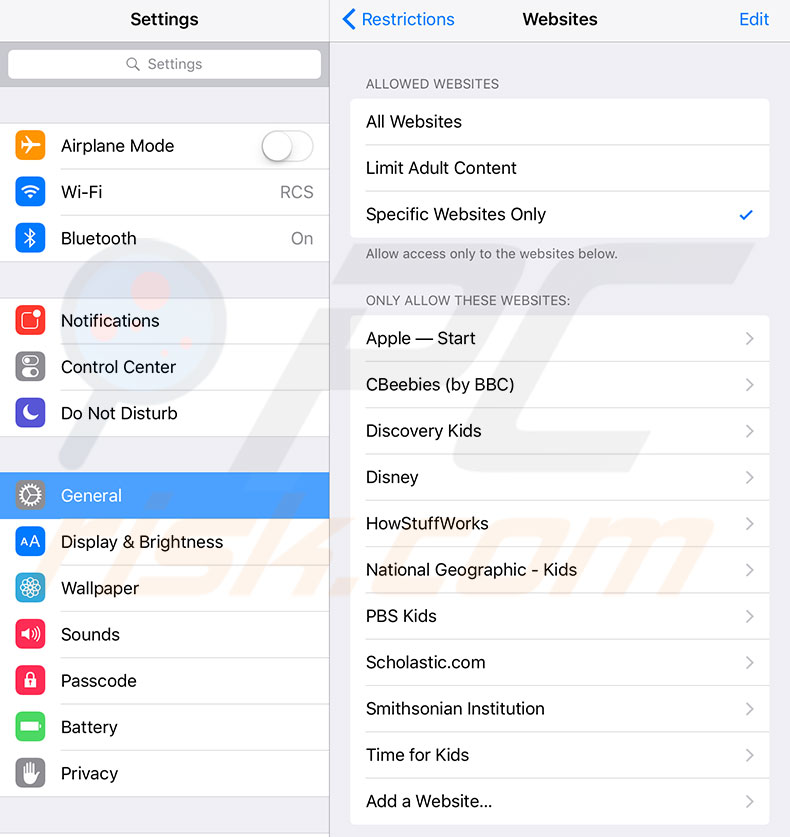
5. Once you have created the password and enabled the restriction function, tap on the Allowed Contents option and then select Websites to begin setting up the blocking process.
6. If you are setting a child's device, select the Limit Adult Content option so that Safari attempts to block websites with adult content automatically.
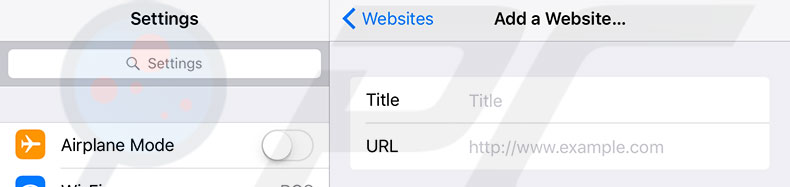
7. Next, add the specific website under the Never Allow option by tapping 'add a website'. You will be prompted to enter the website's URL address you wish to block (for example, www.facebook.com).
8. You may repeat the process by adding a different website each time. Once you have filled the list with websites you wish to block, tap 'Done' to save the newly-created list. With this method, you must enter all separate domains as described above (Safari will block only listed addresses).
9. If you only need to visit a few websites on this particular device, you can choose to block all except specific websites. To select this option, tap on Specific Websites Only and then tap 'Add websites'. Add all websites you wish to allow and then tap Done. From this point, only the listed websites will be loaded. If you still can access the 'blocked' websites, restart your device.

▼ Show Discussion