Virus Is Blocking Internet Access. How to Fix It?

Internet Access Is Blocked by Malware. How to Fix It?
This tutorial describes how to re-establish Internet access if it’s blocked by malware. Some malware variants modify Internet browser settings by adding a Proxy Server. In such a case, you will be unable to visit any websites and unable to download the required software to eliminate the malware.
Other types of malware change the computer’s DNS settings or add various entries to your operating system’s Hosts file. Computer viruses can cause redirect issues or completely block the Internet connection by altering these settings. If you cannot access the Internet, and suspect that a virus infection causes this, check the settings below.
If you cannot access the Internet due to a malware infection, try booting your computer in Safe Mode with Networking. You can find out how to do this in our How to Boot into Safe Mode on Windows 11 and How to Boot into Safe Mode on Windows 10 articles. If you are still unable to access the Internet, use the instructions below.
Download Computer Malware Repair Tool
It is recommended to run a free scan with Combo Cleaner - a tool to detect viruses and malware on your device. You will need to purchase the full version to remove infections. Free trial available. Combo Cleaner is owned and operated by Rcs Lt, the parent company of PCRisk.com read more.
Check Proxy Server Settings
1. Hold down Windows+R keys to open Run.
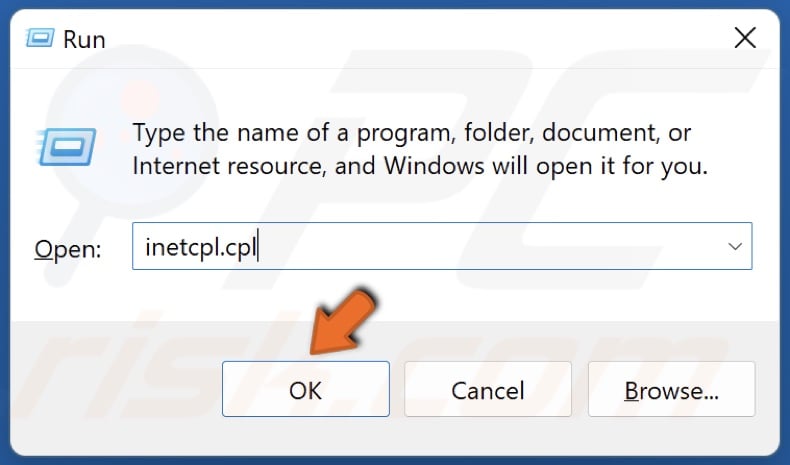
2. In the Run dialog box, type in inetcpl.cpl and click OK.
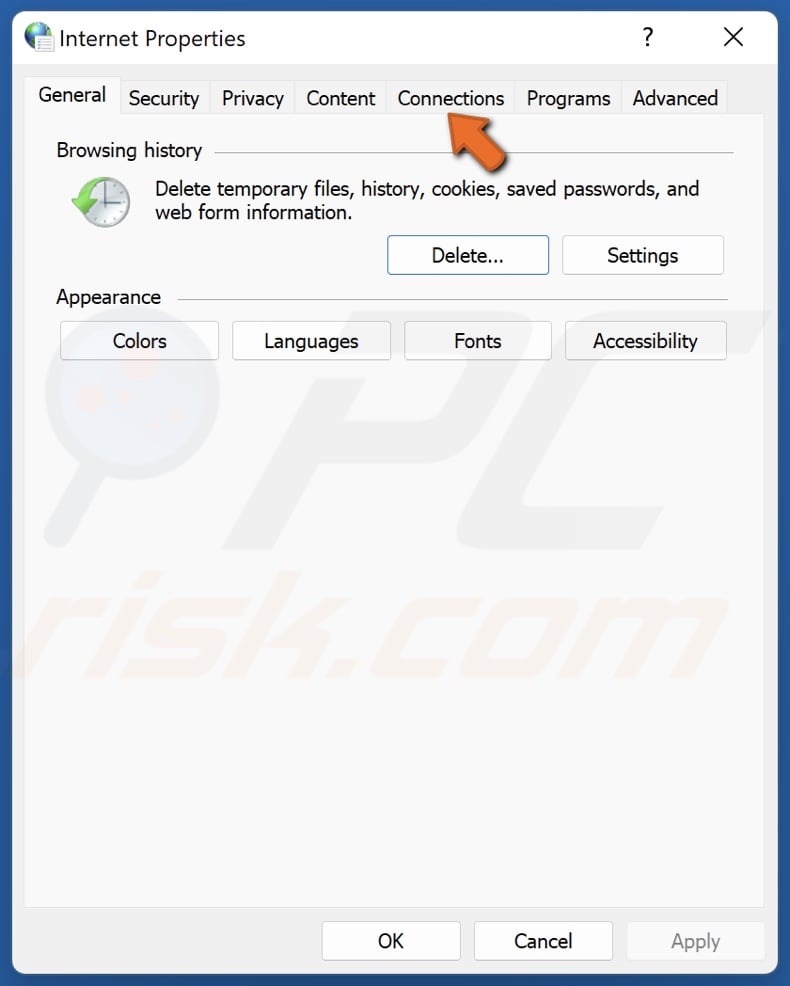
3. In the Internet Properties window, select the Connections tab.
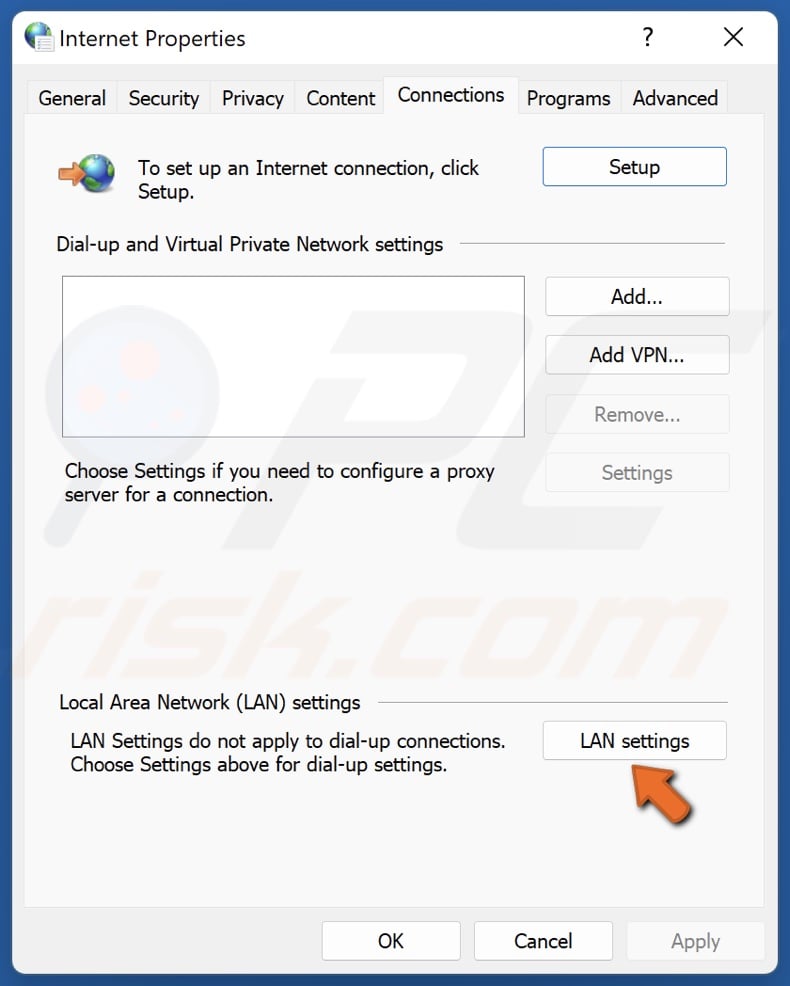
4. Click LAN settings.
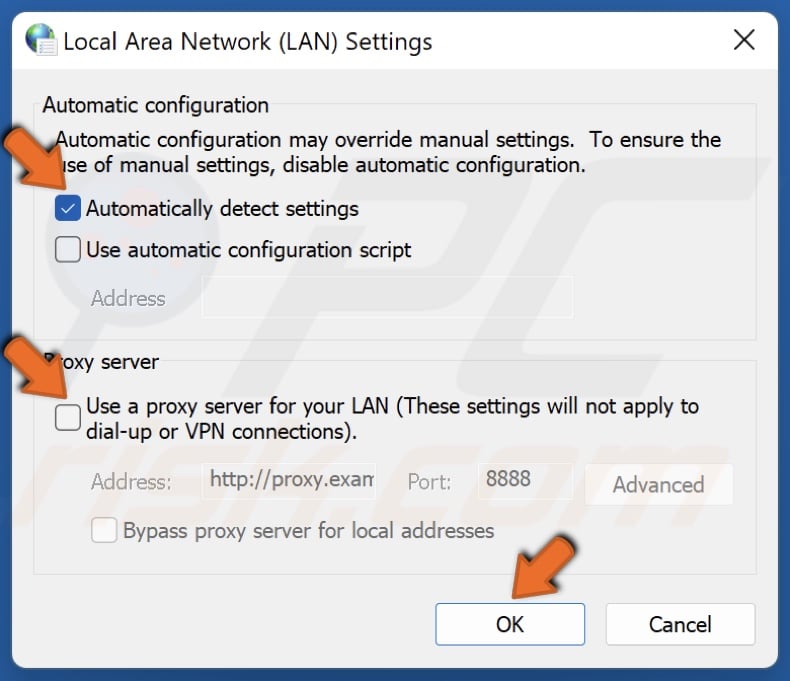
5. Unmark the Use a proxy server for your LAN option.
6. Mark the Automatically detect settings option.
7. Click OK.
Check DNS Server Settings
1. Hold down Windows+R keys to open Run.
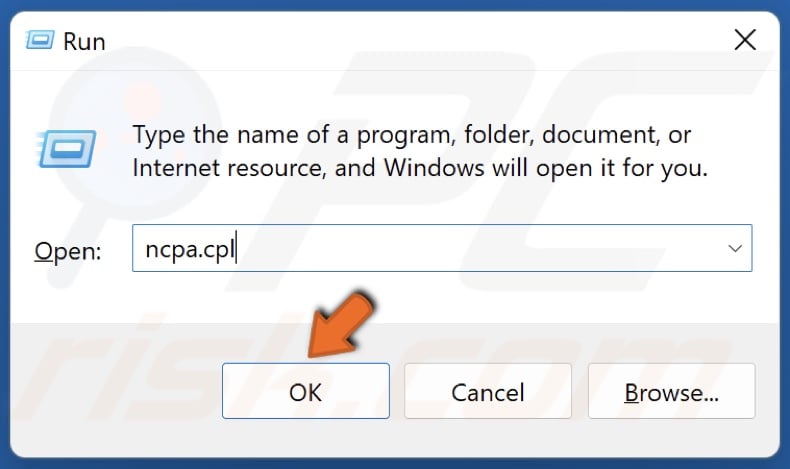
2. In the Run dialog box, type in ncpa.cpl and click OK.

3. Right-click the network adapter and select Properties.
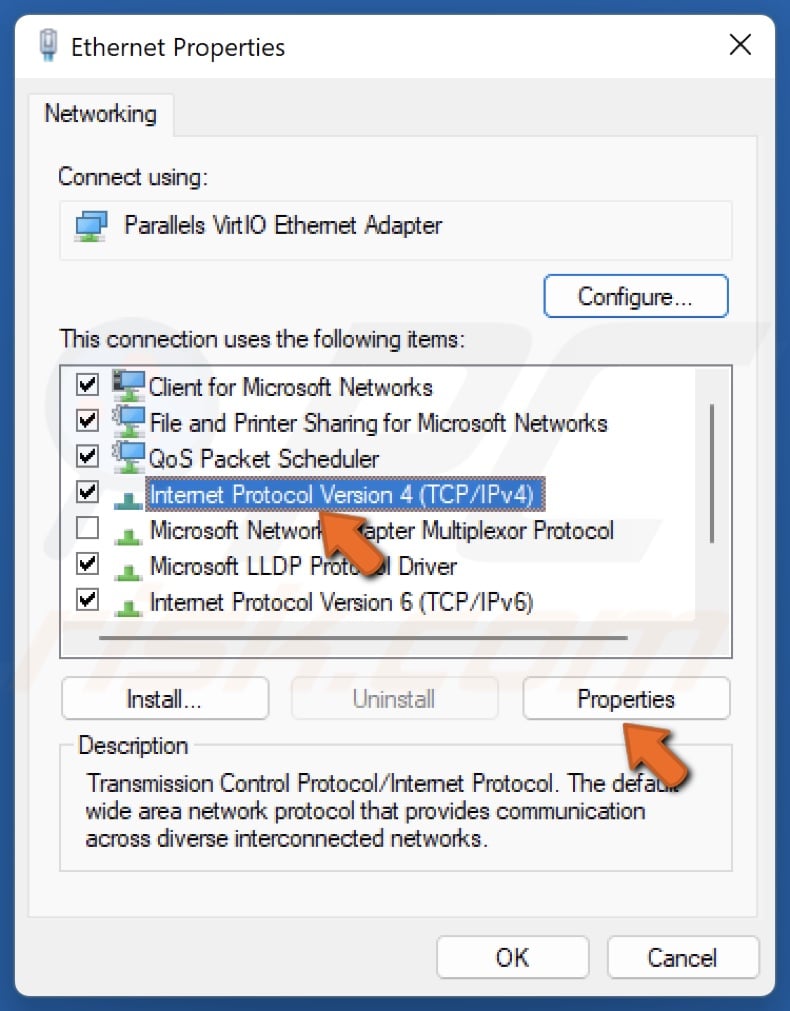
4. Select Internet Protocol Version 4 (TCP/IPv4) and click Properties.
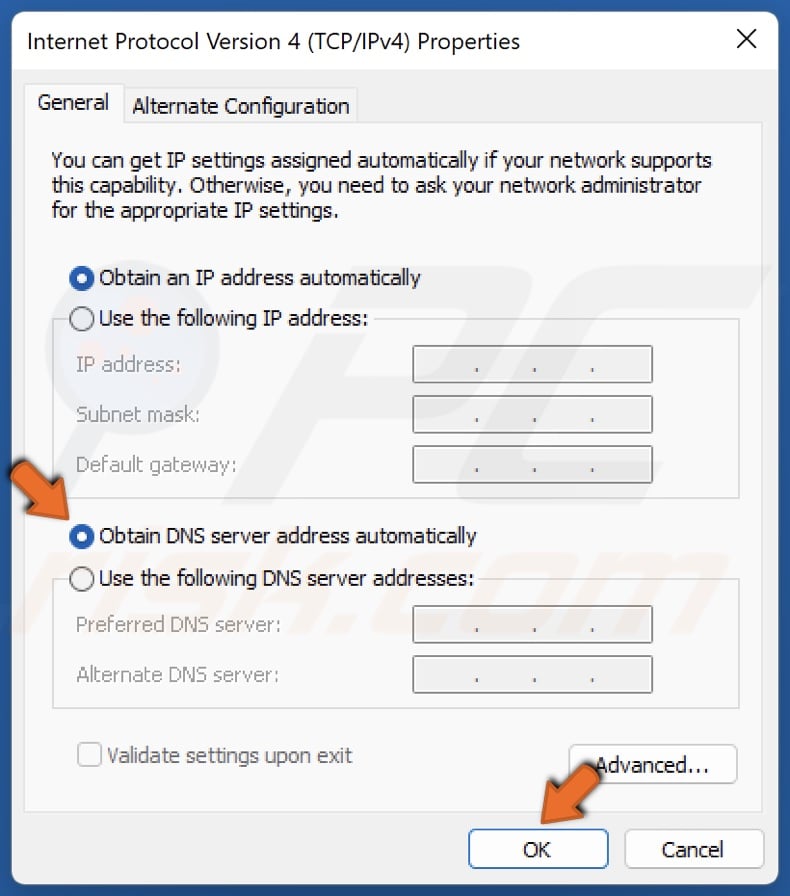
5. Tick the Obtain DNS server address automatically option if a third-party DNS server was set.
6. Click OK to save settings.
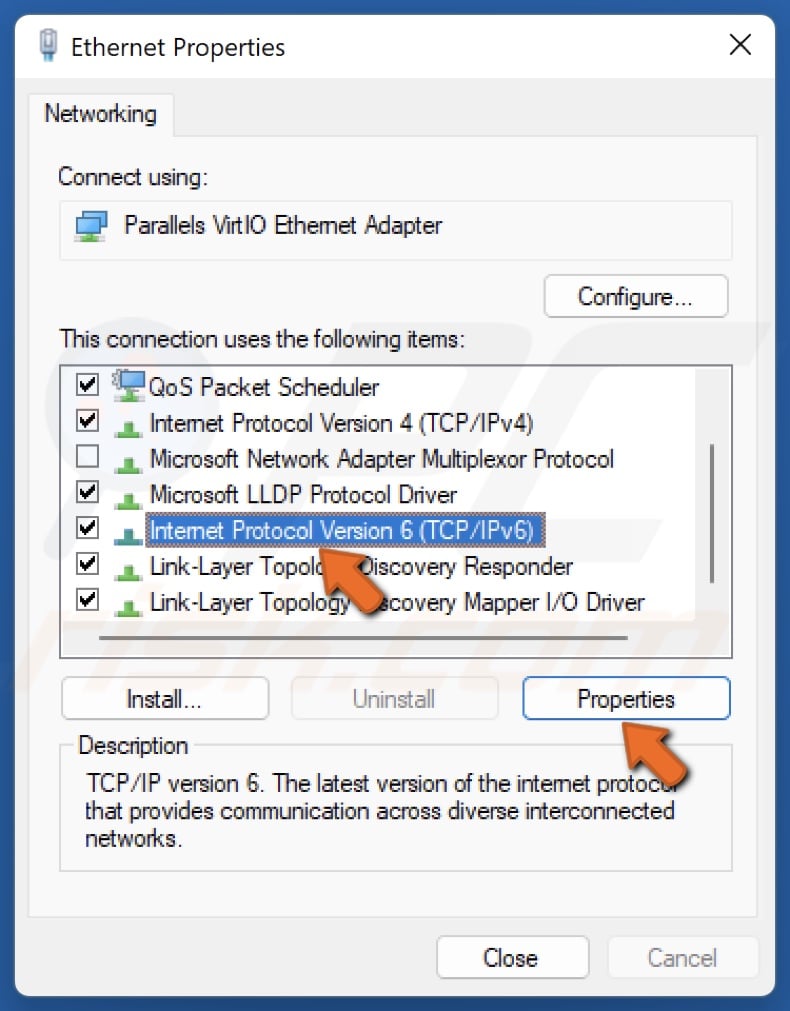
7. Select Internet Protocol Version 6 (TCP/IPv6) and click Properties.
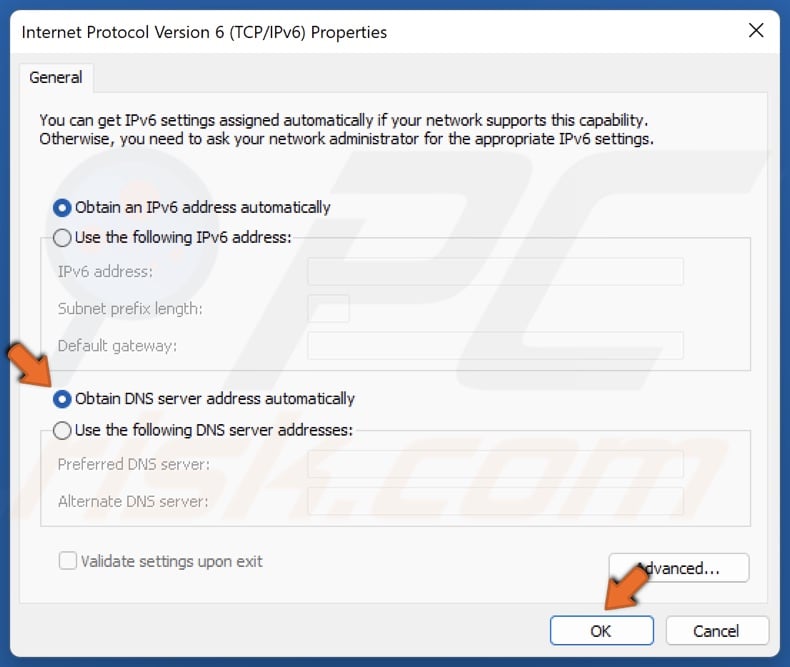
8. Tick the Obtain DNS server address automatically option if a third-party DNS server was set.
9. Click OK to save settings.
10. Restart your PC for the changes to take effect.
Check the Operating System Hosts File
Locate your Hosts file. You should find it at %systemroot%\system32\drivers\etc (C:\Windows\System32\drivers\etc by default). Open the Hosts file with Notepad and verify that no unusual values have been added to it.
These are the default values, and yours should be the same:
Default Windows 11 Hosts File:
# Copyright (c) 1993-2009 Microsoft Corp.
#
# This is a sample HOSTS file used by Microsoft TCP/IP for Windows.
#
# This file contains the mappings of IP addresses to host names. Each
# entry should be kept on an individual line. The IP address should
# be placed in the first column followed by the corresponding host name.
# The IP address and the host name should be separated by at least one
# space.
#
# Additionally, comments (such as these) may be inserted on individual
# lines or following the machine name denoted by a '#' symbol.
#
# For example:
#
# 102.54.94.97 rhino.acme.com # source server
# 38.25.63.10 x.acme.com # x client host
# localhost name resolution is handled within DNS itself.
# 127.0.0.1 localhost
# ::1 localhost
Default Windows 10 Hosts File:
# Copyright (c) 1993-2009 Microsoft Corp.
#
# This is a sample HOSTS file used by Microsoft TCP/IP for Windows.
#
# This file contains the mappings of IP addresses to host names. Each
# entry should be kept on an individual line. The IP address should
# be placed in the first column followed by the corresponding host name.
# The IP address and the host name should be separated by at least one
# space.
#
# Additionally, comments (such as these) may be inserted on individual
# lines or following the machine name denoted by a '#' symbol.
#
# For example:
#
# 102.54.94.97 rhino.acme.com # source server
# 38.25.63.10 x.acme.com # x client host
# localhost name resolution is handled within DNS itself.
# 127.0.0.1 localhost
# ::1 localhost
Default Windows 8.1 Hosts File:
# Copyright (c) 1993-2009 Microsoft Corp.
#
# This is a sample HOSTS file used by Microsoft TCP/IP for Windows.
#
# This file contains the mappings of IP addresses to host names. Each
# entry should be kept on an individual line. The IP address should
# be placed in the first column followed by the corresponding host name.
# The IP address and the host name should be separated by at least one
# space.
#
# Additionally, comments (such as these) may be inserted on individual
# lines or following the machine name denoted by a '#' symbol.
#
# For example:
#
# 102.54.94.97 rhino.acme.com # source server
# 38.25.63.10 x.acme.com # x client host
# localhost name resolution is handled within DNS itself.
# 127.0.0.1 localhost
# ::1 localhost
Default Windows 7 Hosts File:
# Copyright (c) 1993-2006 Microsoft Corp.
#
# This is a sample HOSTS file used by Microsoft TCP/IP for Windows.
#
# This file contains the mappings of IP addresses to host names. Each
# entry should be kept on an individual line. The IP address should
# be placed in the first column followed by the corresponding host name.
# The IP address and the host name should be separated by at least one
# space.
#
# Additionally, comments (such as these) may be inserted on individual
# lines or following the machine name denoted by a '#' symbol.
#
# localhost name resolution is handle within DNS itself.
# 127.0.0.1 localhost
# ::1 localhost
Default Windows Vista Hosts File:
# Copyright (c) 1993-2006 Microsoft Corp.
#
# This is a sample HOSTS file used by Microsoft TCP/IP for Windows.
#
# This file contains the mappings of IP addresses to host names. Each
# entry should be kept on an individual line. The IP address should
# be placed in the first column followed by the corresponding host name.
# The IP address and the host name should be separated by at least one
# space.
#
# Additionally, comments (such as these) may be inserted on individual
# lines or following the machine name denoted by a '#' symbol.
#
127.0.0.1 localhost
::1 localhost
Default Windows XP Hosts File:
# Copyright (c) 1993-1999 Microsoft Corp.
#
# This is a sample HOSTS file used by Microsoft TCP/IP for Windows.
#
# This file contains the mappings of IP addresses to host names. Each
# entry should be kept on an individual line. The IP address should
# be placed in the first column followed by the corresponding host name.
# The IP address and the host name should be separated by at least one
# space.
#
# Additionally, comments (such as these) may be inserted on individual
# lines or following the machine name denoted by a '#' symbol.
#
127.0.0.1 localhost
After checking and correcting these settings, your Internet connection should be back to normal. If you are dealing with malware infections, we recommend downloading anti-spyware software from our Top Anti-Spyware programs list and running a full system scan.
Share:

Tomas Meskauskas
Expert security researcher, professional malware analyst
I am passionate about computer security and technology. I have an experience of over 10 years working in various companies related to computer technical issue solving and Internet security. I have been working as an author and editor for pcrisk.com since 2010. Follow me on Twitter and LinkedIn to stay informed about the latest online security threats.
▼ Show Discussion