Make Safari Faster and More Secure With Public DNS
![]() Written by Karolina Peistariene on
Written by Karolina Peistariene on
Improve Safari's Browsing Speed and Security by Adjusting DNS Settings
Changing the DNS server settings is not a difficult task and can allow users to achieve a quicker response time (and websites load faster). These settings impact all web browsers you are using. Furthermore, open DNS servers (or public servers) usually contain more protection tools than ISP servers.
DNS servers often encounter various issues resulting in unresponsive web browsers and unreachable websites/pages. Considering the pros and cons of open and public DNS servers, below we describe how you can change DNS settings on your Mac.
Video showing How to Change DNS Settings on Mac?
Table of Contents:
- Introduction
- Benefits of Public DNS servers
- Update DNS settings on Mac computers
- Adjust DNS settings on iOS devices
- Adjust DNS settings on Windows computers
- Video showing How to Change DNS Settings on Mac?
Benefits of Public DNS servers
Below we clarify the advantages of public DNS servers.
Performance. Implements 'smart' caching to decrease response times.
Security. One of the most important vulnerabilities of open DNS servers is spoofing attacks, which modify the cache of name servers. As a result, visitors are redirected to potentially malicious websites. This is not the case with public DNS servers.
Accurate results. Always respond with correct results, regardless of the query entered, and follow DNS standards.
Update DNS settings on Mac computers
Changing DNS settings on Mac computers is simple, requiring just a few clicks. The fastest DNS servers are probably Cloudflare DNS servers. Alternatively, you can choose Google's public DNS servers or Open DNS servers.
1. Start by going to Mac System Preferences, open Network, and select the network you wish to adjust DNS settings.
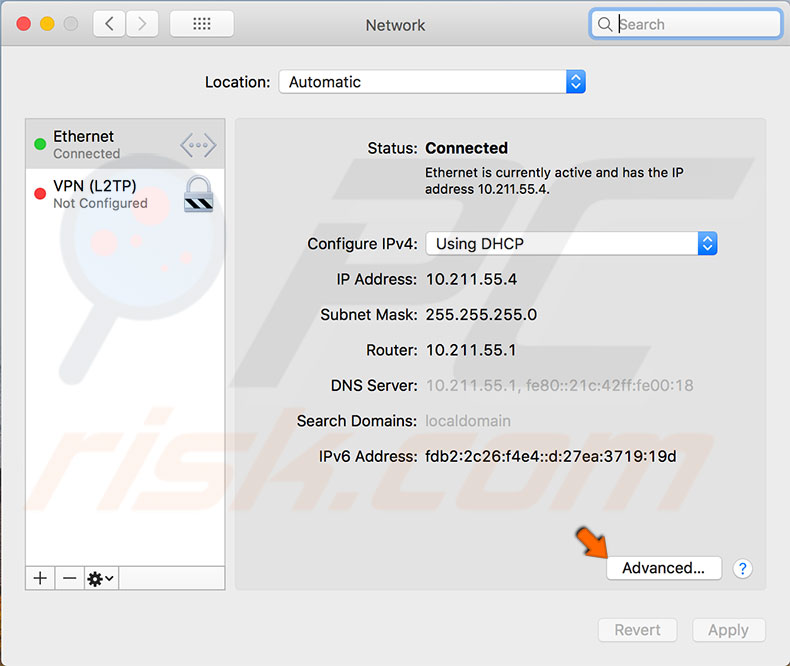
2. You can change the DNS for both ethernet and Wi-Fi connections. Click on Advanced.
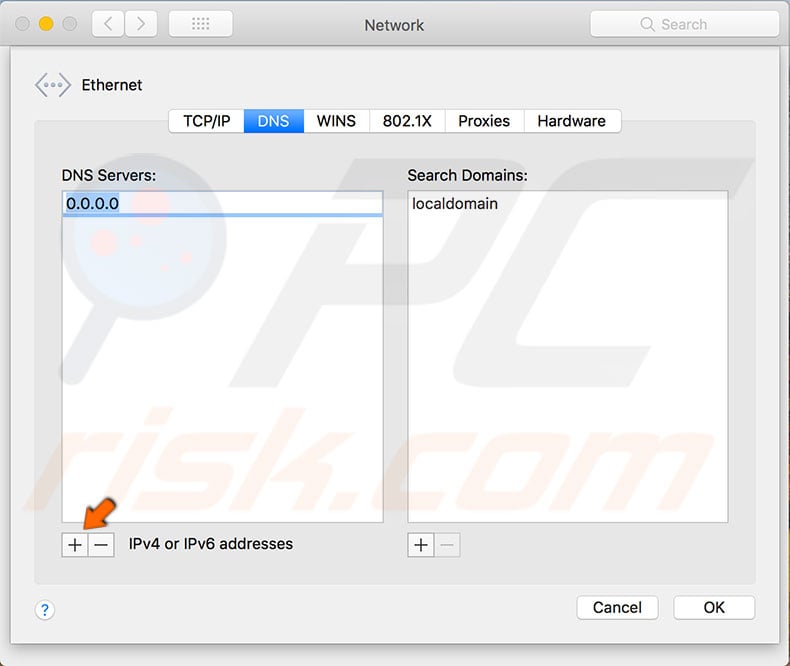
3. Select the DNS tab in the newly opened window and look for the Add(+) button at the bottom of the DNS servers list.
4. Type the following IPv4 addresses: 1.1.1.1, 1.0.0.1, and IPv6 addresses: 2606:4700:4700:1111, 2606:4700:4700:1001 by clicking the Add button after each.
5. If you wish, use Cloudflare's consumer DNS service or any other you prefer.
6. When all entries are complete, click OK and then click Apply to save the changes.
You may not notice changes after adjusting DNS settings until you clear the DNS cache or restart the Mac. If you cannot restart the computer, follow this detailed guide on flush the DNS cache on Mac.
Adjust DNS settings on iOS devices
Changing DNS preferences on mobile Apple devices is similar to Mac computers and also simple. Only several taps and you will be browsing the Internet faster.
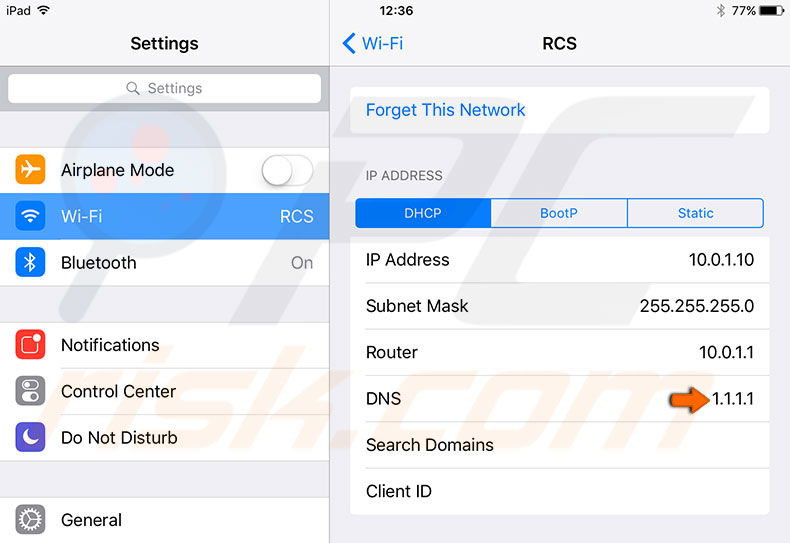
1. Open iDevice settings and tap on Wi-Fi.
2. Then look for the network you are using and tap on the information (i) icon.
3. Look for a DNS section and tap on Configure DNS.
4. In the new window, select manual and then tap on Add Server.
5. Write down the existing server addresses in case the new ones do not work properly.
6. Then type in the Cloudflare's IPv4 addresses: 1.1.1.1, 1.0.0.1 and IPv6 addresses: 2606:4700:4700:1111, 2606:4700:4700:1001
7. Press Return and Save.
Adjust DNS settings on Windows computers
Compared with a Mac computer, changing DNS settings on a Windows computer is more complicated. Several steps are required to successfully change them, as described below.
1. To start, go to the Control panel, open Network and Internet.
2. Select Network and Sharing Center, and click on Change adapter settings.
3. Next, choose the network you are using. If you are using an Ethernet network, right-click Local Area Connection and select Properties. If you are connected to a Wi-Fi network, right-click on Wireless Network Connection and select Properties. Choose your current wireless network.
4. Select the Networking tab, and from the list under This connection uses the following items, select Internet Protocol version 4 (TCP/IPv4) or Internet Protocol Version 6 (TCP/IPv6), and then click Properties.
5. In the newly opened window, click Advanced and select the DNS tab. If you have found any addresses, write them down if you need to switch back to the default settings. Remove them and click OK.
6. In the bottom label, select Use the following DNS server addresses.
7. Write down the entries if they exist. Then remove them and type in Cloudflare's consumers DNS depending on the Protocol version:
IPv4 preferred DNS server: 1.1.1.1, alternate DNS server: 1.0.0.1
IPv6 preferred DNS server: 2606:4700:4700:1111, alternate DNS server: 2606:4700:4700:1001
8. Click OK.
If adjusting DNS settings did not improve Safari's browsing speed, try clearing the cache and cookies by following a detailed guide here.

▼ Show Discussion