How to Fix Windows "Can't connect to this network" Error
![]() Written by Rimvydas Iliavicius on
Written by Rimvydas Iliavicius on
How to Fix "Can't connect to this network" Error in Windows 10
If you are using Windows 10 and getting the "Can't connect to this network" error, then there are several reasons why your computer might not connect to a particular network. This article shows easy ways to fix this error.
What Causes This Error?
You may get this error if something is wrong with your network adapter or associated driver (the error could be caused by an old or incorrect network driver). In this case, try to update or install a different (correct) network adapter driver.
In other cases, you may have to disable the IPv6 network protocol so that you can connect to the internet and fix this problem.
Often, it's a simple matter of resetting your router to make your system 'forget' the current network connection and reestablish it.
There could also be other reasons and ways to fix the connection. We suggest that you start with the most straightforward solution and see if this helps. If not, try other solutions until you find one that works for you.
Video Guide on How to Fix "Can't Connect to this network" Error
Table of Contents:
- Introduction
- Uninstall Network Adapter
- Update Network Adapter Driver
- Roll Back Network Adapter Driver
- Reset Your Router
- Run Network Troubleshooter
- Run Network Troubleshooting Commands
- Disable IPv6 on Your Computer
- Disable and Enable Your Connection
- Uninstall ESET Smart Security Antivirus
- Video Guide on How to Fix "Can't connect to this network" Error
Uninstall Network Adapter
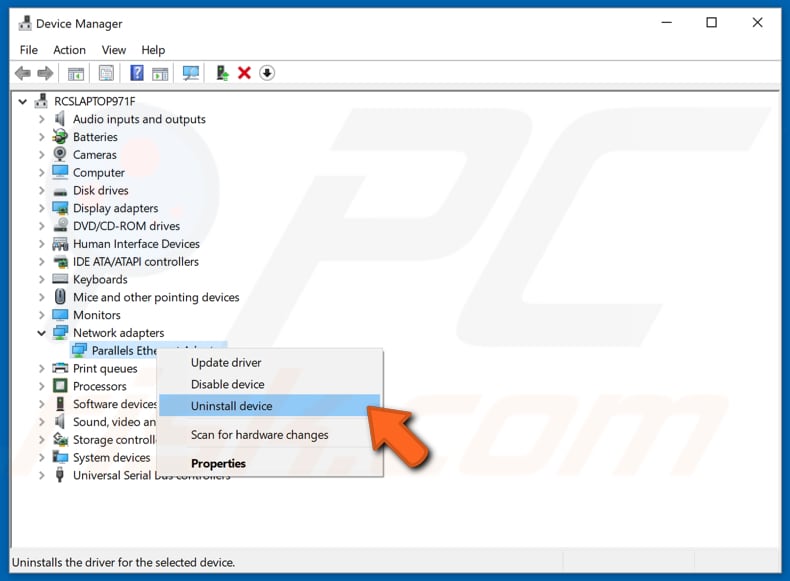
If the problem is with the network adapter (the driver), try to uninstall it and let Windows 10 automatically reinstall it. To uninstall your network adapter driver, go to Device Manager. Open it by typing "device manager" in Search and select the given result.

Look for "Network adapters" in the Device Manager app and expand it, select your network adapter, and right-click on it. Click "Uninstall device" to uninstall it.
Mark the "Delete the driver software for this driver" checkbox and click "Uninstall."
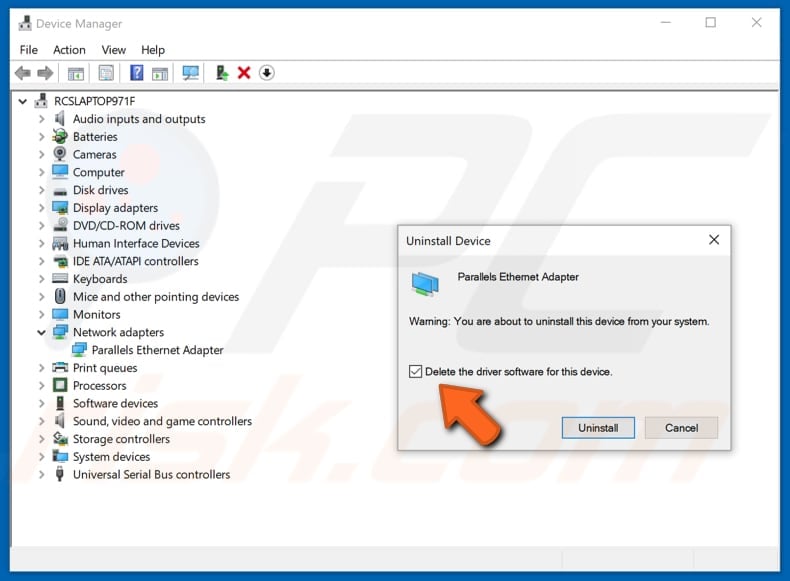
Restart your computer. Windows will automatically install a new driver for your network adapter the next time you start Windows 10.
Update Network Adapter Driver
This problem might be caused by an old or incorrect driver - get an updated/new driver for your network adapter. This can be done automatically with the Snappy Driver Installer. You can download Snappy Driver Installer from here.
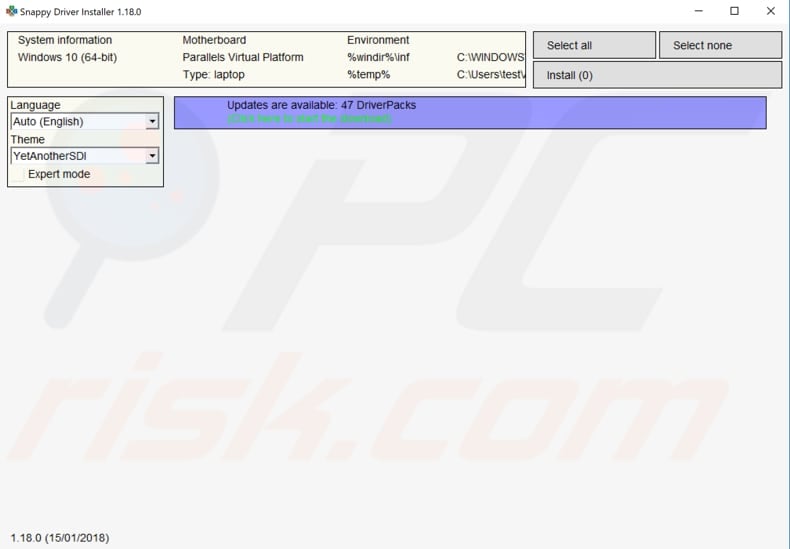
After you have finished updating and installing drivers, restart Windows 10 to take effect and connect to the Internet to see if it works.
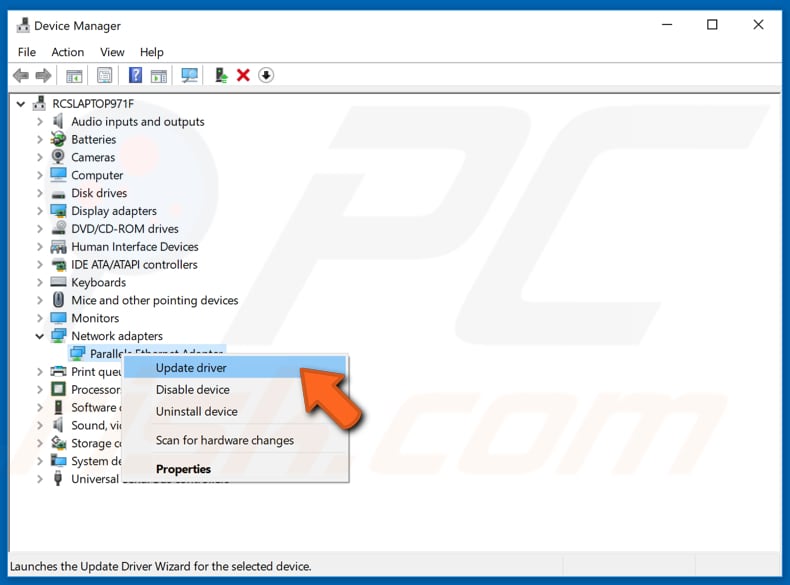
You can also update your driver manually. But, you will need a computer with a working Internet connection. Go to the network adapter manufacturer's website. Download the latest driver and copy it onto a USB drive. Go to Device Manager (type "device manager" in Search and open it). Expand the "Network adapters" section, select your network adapter, right-click on it, and choose "Update Driver."
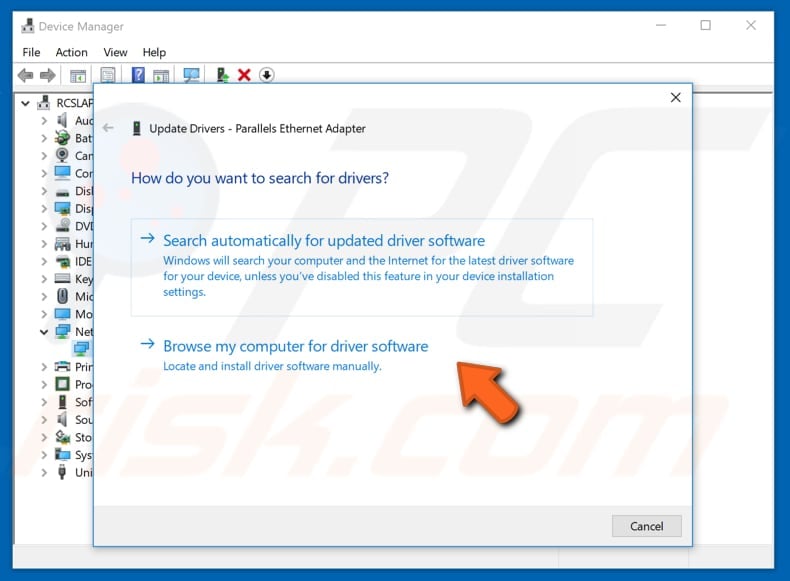
You will be asked how to search for drivers and are given two options: 1) to search automatically for updated driver software; 2) to browse your computer for driver software. The first option requires an Internet connection. If you have problems with your internet connection, choose the second option. Locate the driver (on your USB drive) and follow the instructions.
When you have finished installing the new/updated driver, restart your computer for the changes to take effect and see if the network connectivity problem is fixed.
Roll Back Network Adapter Driver
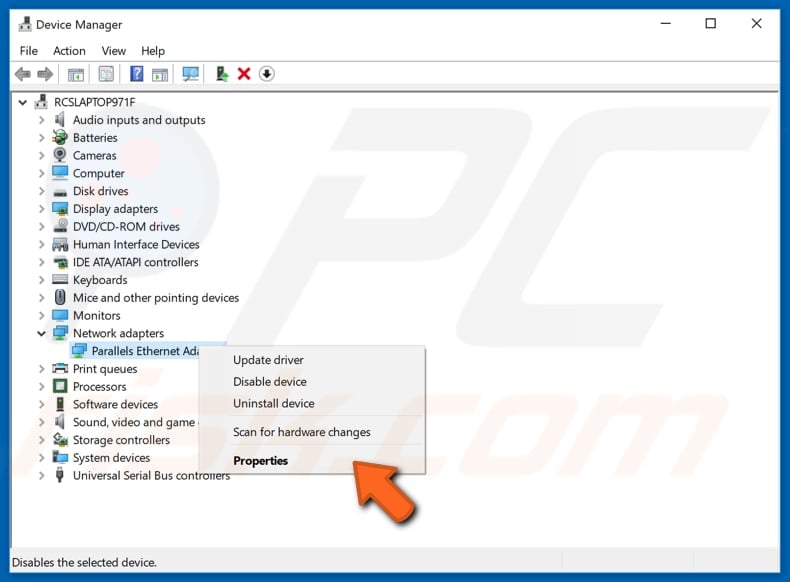
This option might work if you could connect to the Internet, and the problem appeared recently after you updated your network adapter driver or installed another driver. To roll back your network adapter driver, open Device Manager and open the network adapter properties. Expand the "Network adapters" section and right-click on your adapter. Select "Properties."
In the Properties window, click the "Drivers" tab and select "Roll Back Driver."
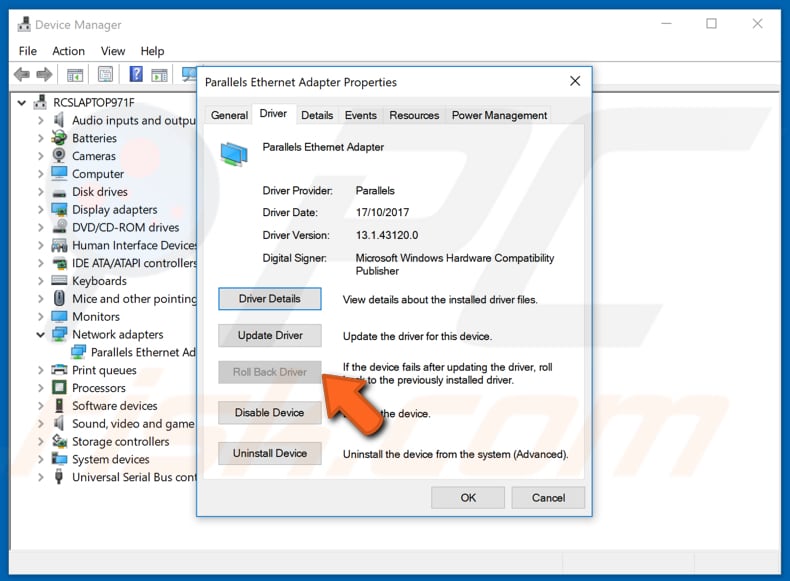
If the "Roll Back Driver" option is not available, no driver is available to roll back to. If this option is available for you, then restart your computer after rolling back the driver for the changes to take effect.
Reset Your Router
This is one of the easiest ways to reset your router - many users reported that it helped them fix the problem. There should be a reset button on your router - push it to reset. If there is no reset button, you can simply unplug (turn off) your router to reset it. When that is done, try to re-establish your network connection.
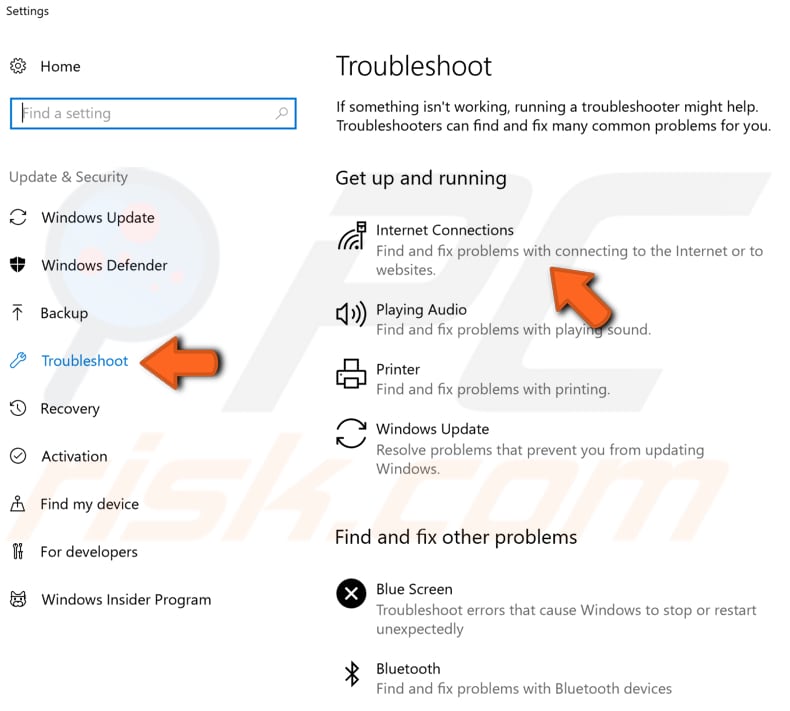
Run Network Troubleshooter
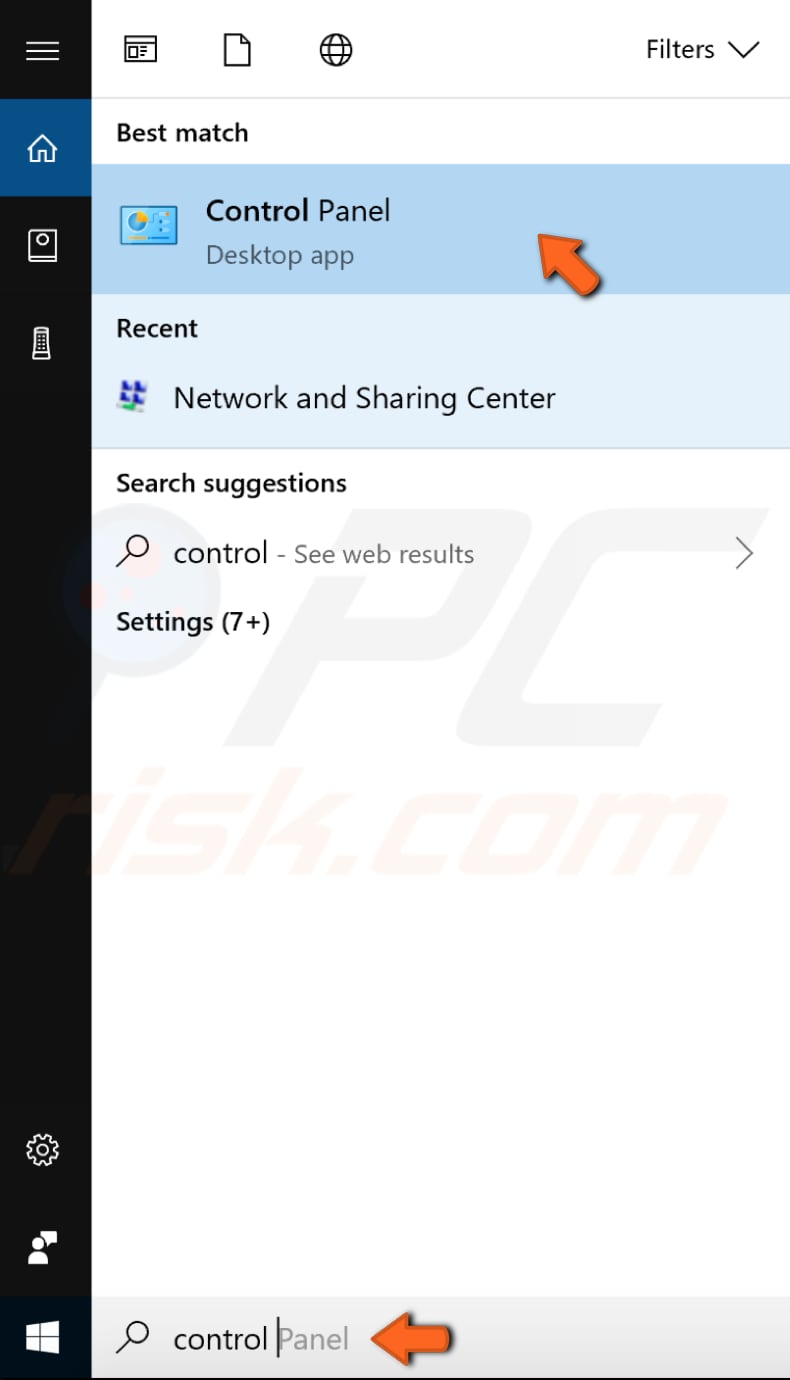
Network Troubleshooter helps you diagnose and fix common network connectivity problems on your computer. To run Network Troubleshooter, open Control Panel by typing "control panel" in Search and select "Control Panel."
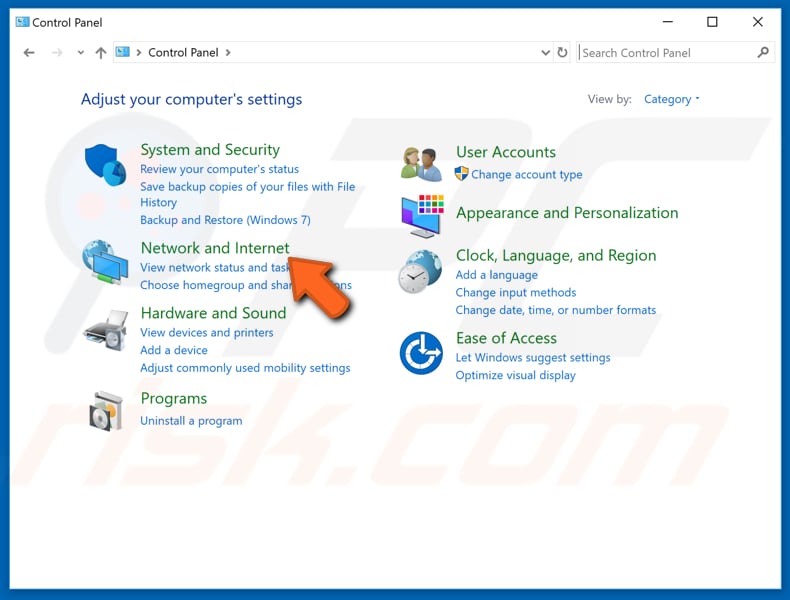
In the Control Panel Window, click "Network and Internet."
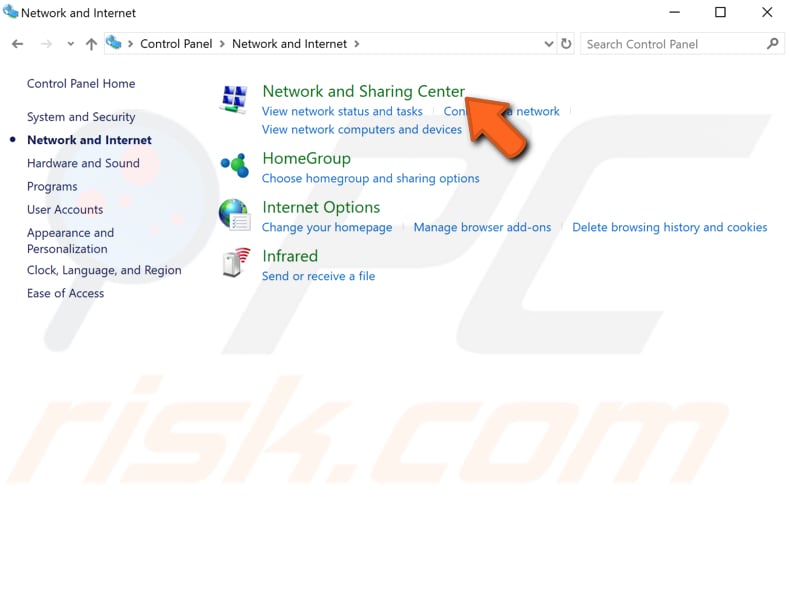
In the Network and Internet window, click "Network and Sharing Center."
In the Network and Sharing Center, click "Troubleshoot problems."
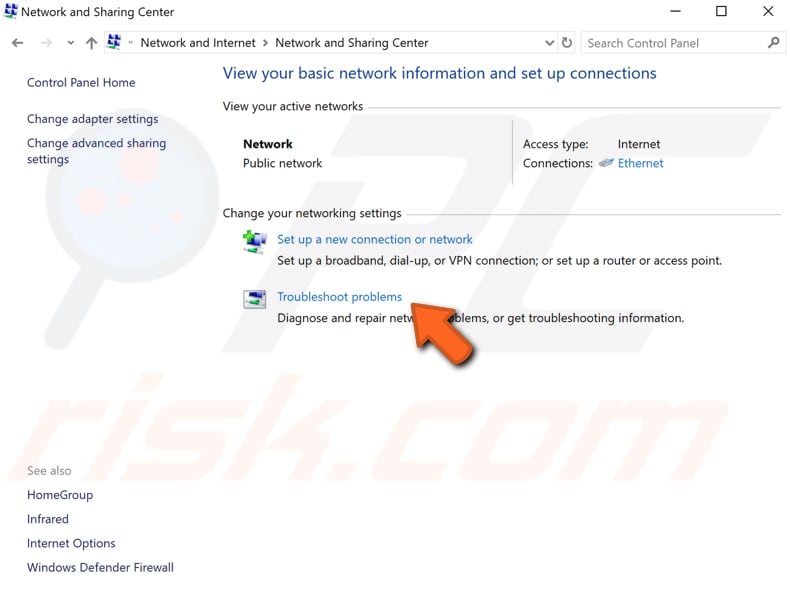
This will direct you to the Troubleshoot window, where you can choose which problems you want to fix. You should see the "Internet Connections" option. Click this to locate and fix problems with connecting to the Internet or websites - Windows will start the troubleshooter for you.
Run Network Troubleshooting Commands
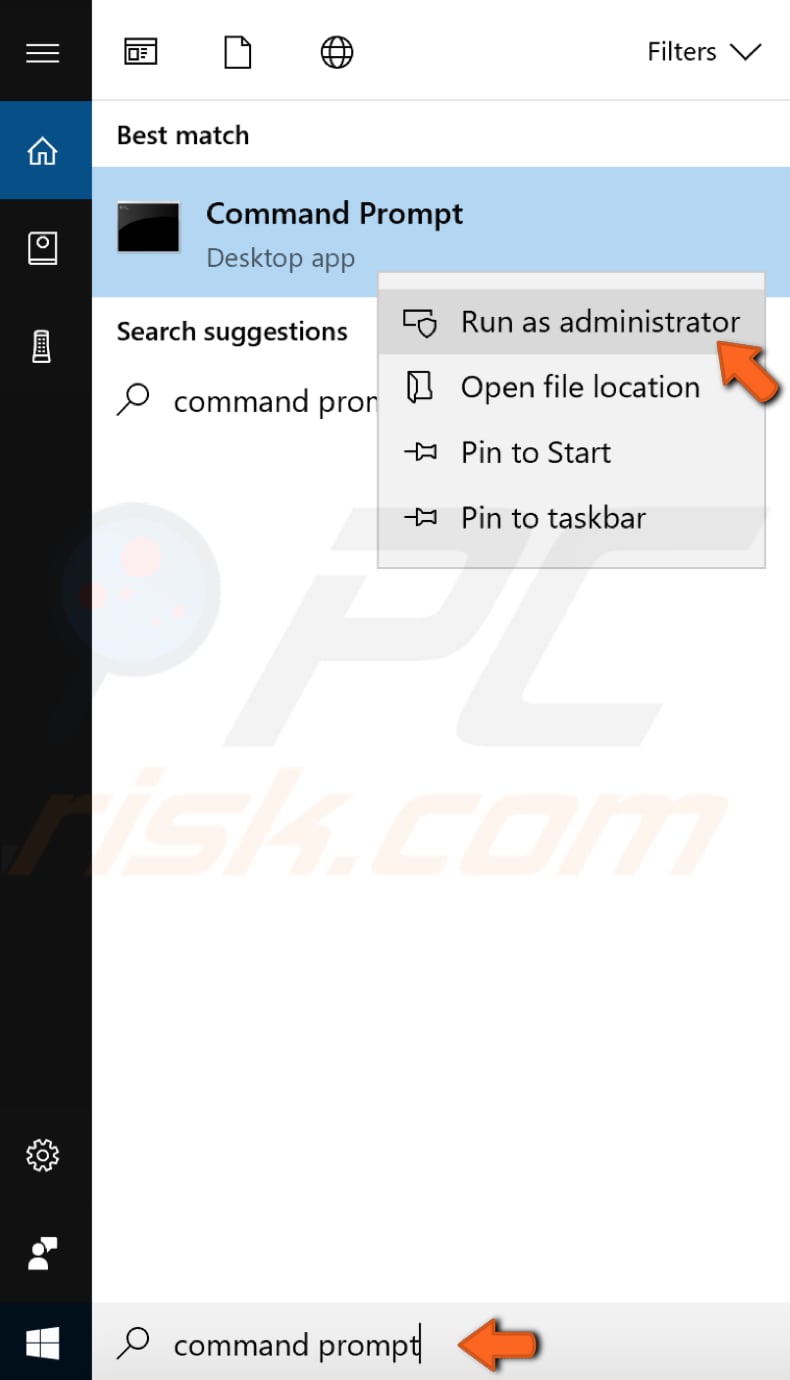
Use Command Prompt to run certain network troubleshooting commands to reset the TCP/IP Stack, Release IP address, Renew IP address, Flush, and Reset the DNS client resolver cache. First, open Command Prompt by typing "command prompt" in Search and right-click on the "Command Prompt" result. Choose "Run as administrator" to run it with administrator privileges.
Once Command Prompt is opened, type in your commands. You need to type in a list of commands (you can enter them manually or copy and paste them individually into the Command Prompt window). Press Enter on your keyboard after you type (or copy and paste) each command. Here is the list of commands:
netsh winsock reset
netsh int ip reset
ipconfig /release
ipconfig /renew
ipconfig /flushdns
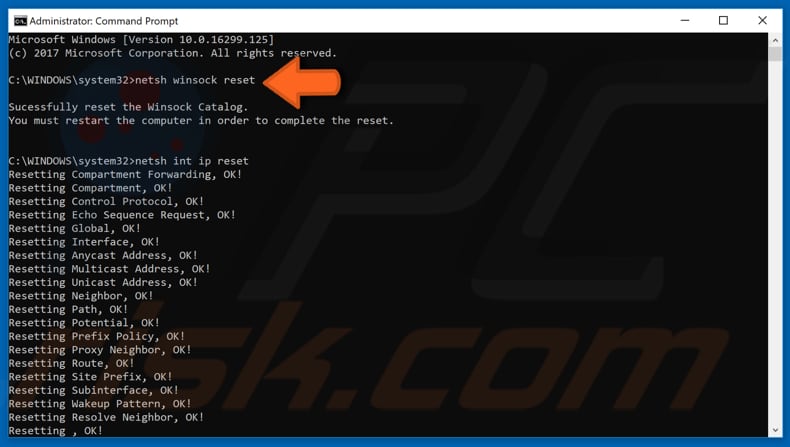
Once you have finished entering commands, exit the Command Prompt window. Remember, you must restart your computer for the changes to take effect. After the restart, check if you are still getting the "Can't connect to this network" error.
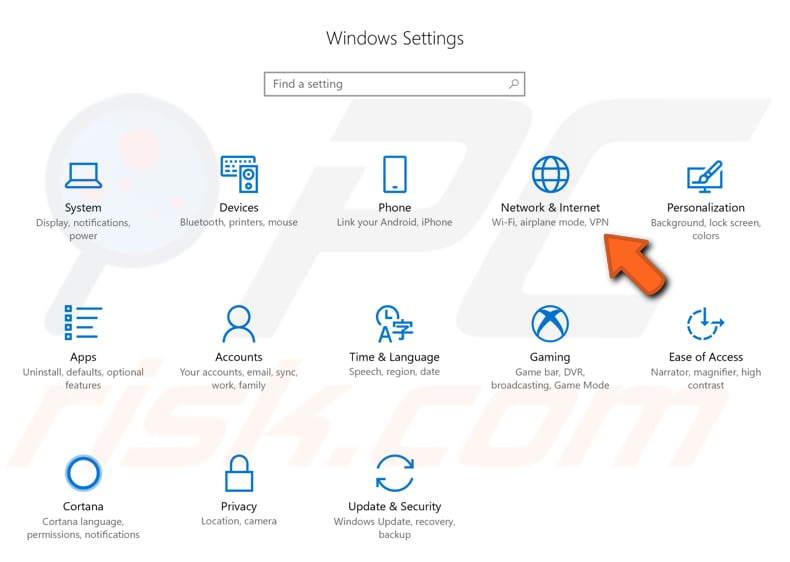
Disable IPv6 on Your Computer
One of the solutions to this problem is to disable the IPv6 network protocol on your computer. Go to Settings (in Start Menu) and select "Network & Internet."
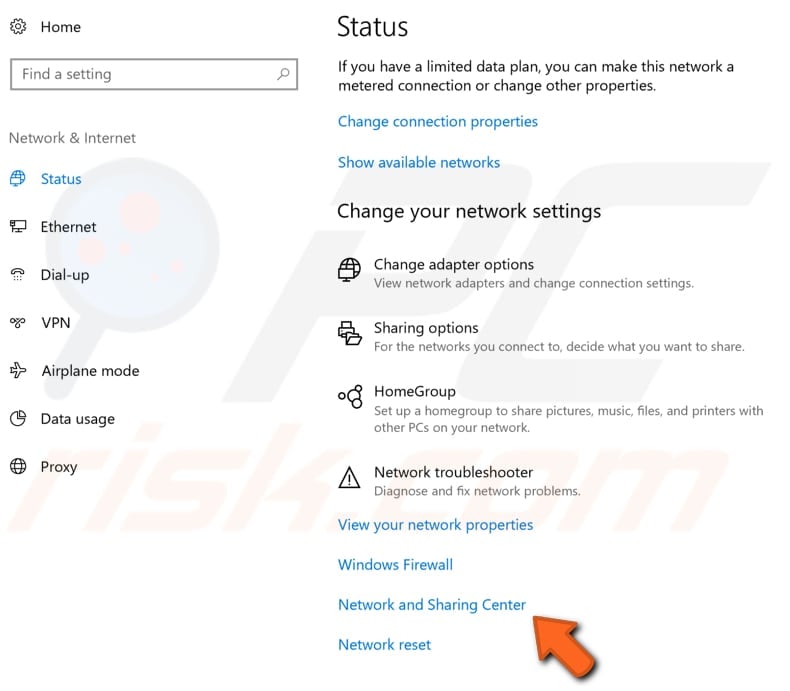
In the Network and Internet settings window (in the "Status" pane), locate "Network and Sharing Center" at the bottom and click on it.
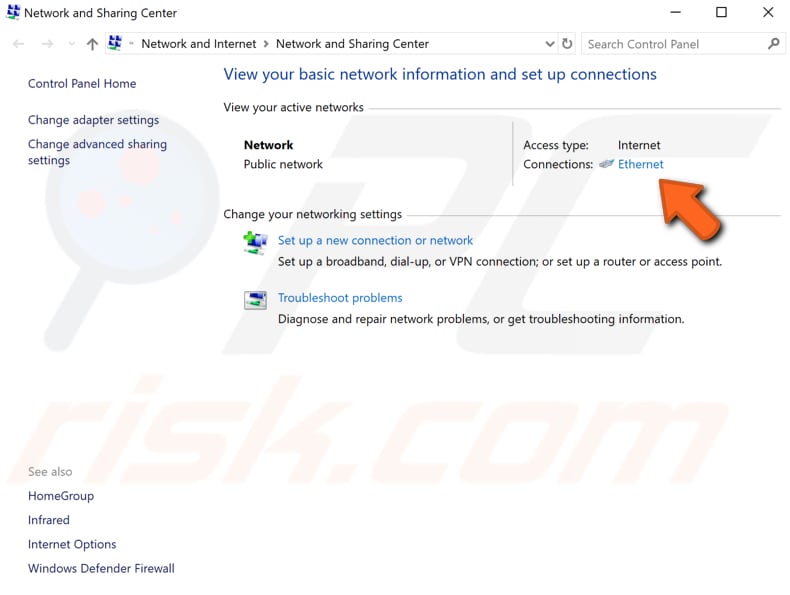
Once you are in the Network and Sharing Center window, click your current connection. In our case, "Ethernet."
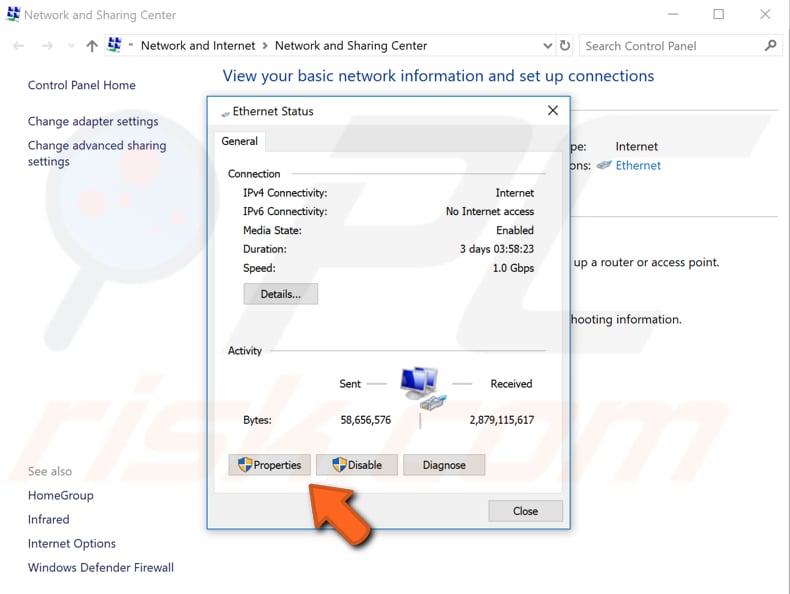
In the Connection Status window, click "Properties."
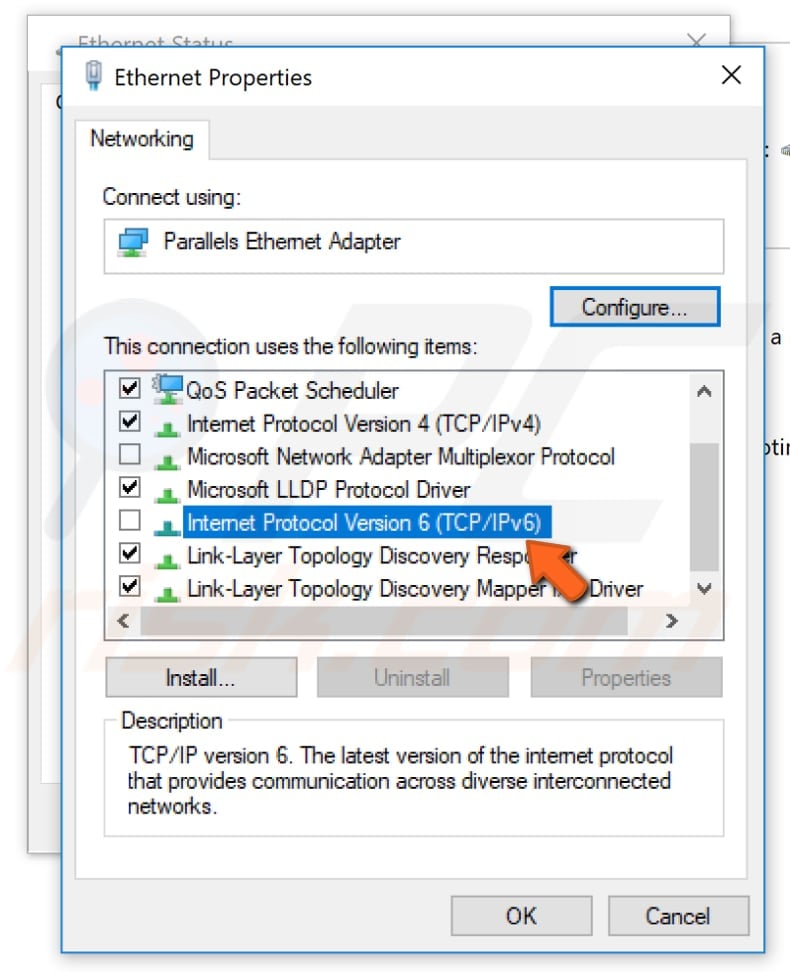
In the Properties window, you will see the text, "This connection uses the following items:" Look for "Internet Protocol Version 6 (TCP/IPv6)" and unmark the checkbox beside it. Click OK when finished.
Restart your computer to apply the changes made and check if there is still a problem with your internet connection. If this does not help, you might also need to disable IPv6 on your router. Disabling it on your router is a somewhat complicated process. We suggest you read your router manual first.
If you recently upgraded to Windows 10, it might be that IPv4 and IPv6 protocols are disabled after the upgrade. In this case, try the opposite of disabling the IPv6 protocol: check that both protocols (IPv4 and IPv6) are enabled. Then, restart your computer and try to connect to the Internet again.
Disable and Enable Your Connection
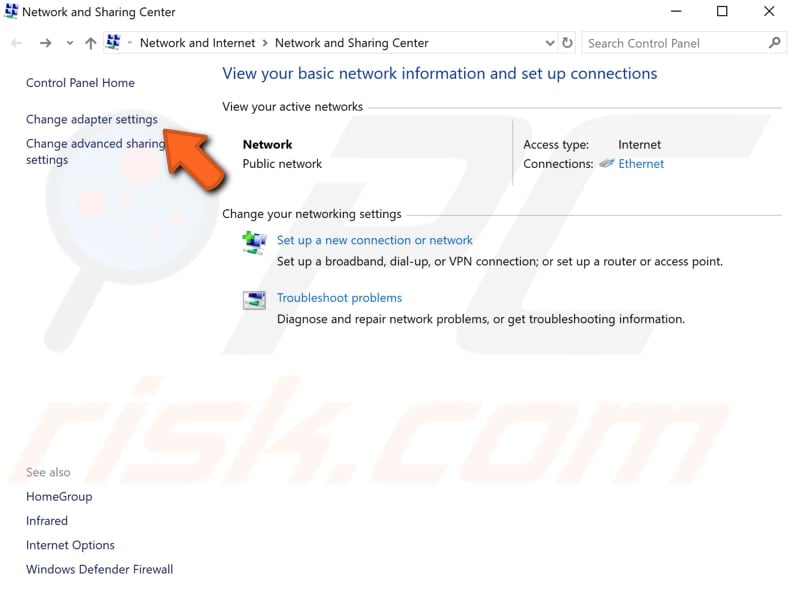
You can try to disable and enable your internet connection - this is a simple action that might help fix the problem. To disable (and later enable) your connection, go to the Network and Sharing Center and click "Change adapter settings."
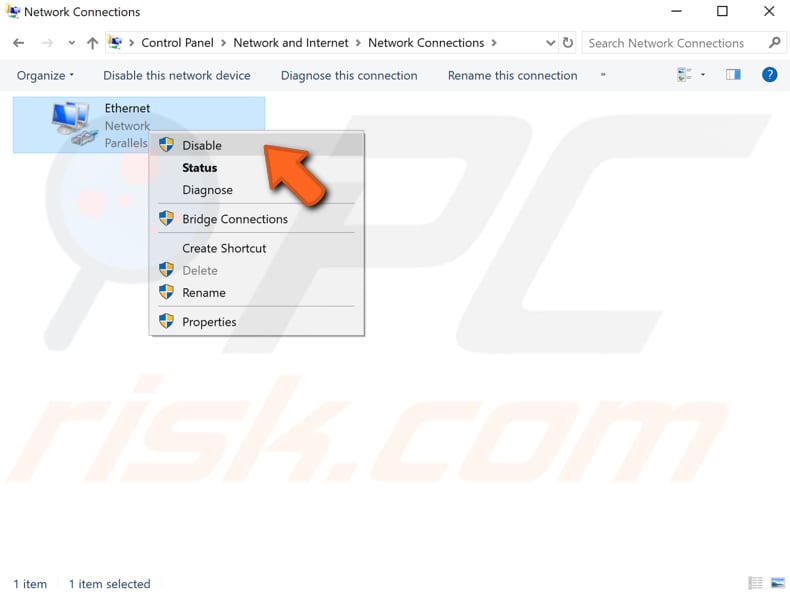
Right-click on your connection and select "Disable" from the drop-down menu. When disabled, right-click on it again and select "Enable."
Uninstall ESET Smart Security Antivirus
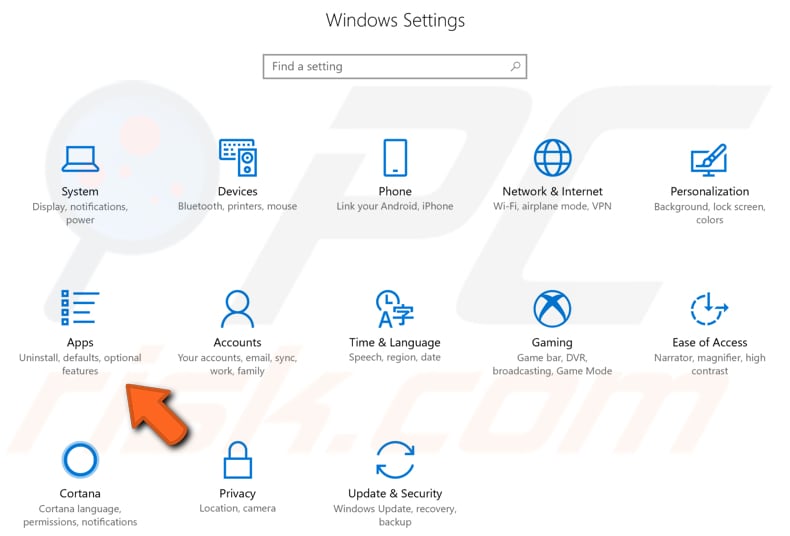
There are reports from some users that ESET Smart Security is associated with this "Can't connect to this network" error. According to users, ESET Smart Security prevents your system from detecting an Ethernet card on your computer. If this is the case, uninstall it from your Windows. ESET is not the only antivirus program that can cause this problem on Windows 10. If your Internet connection starts working after the uninstall, you can reinstall your antivirus software. To uninstall ESET Smart Security (or other antivirus software), go to Settings and click "Apps."
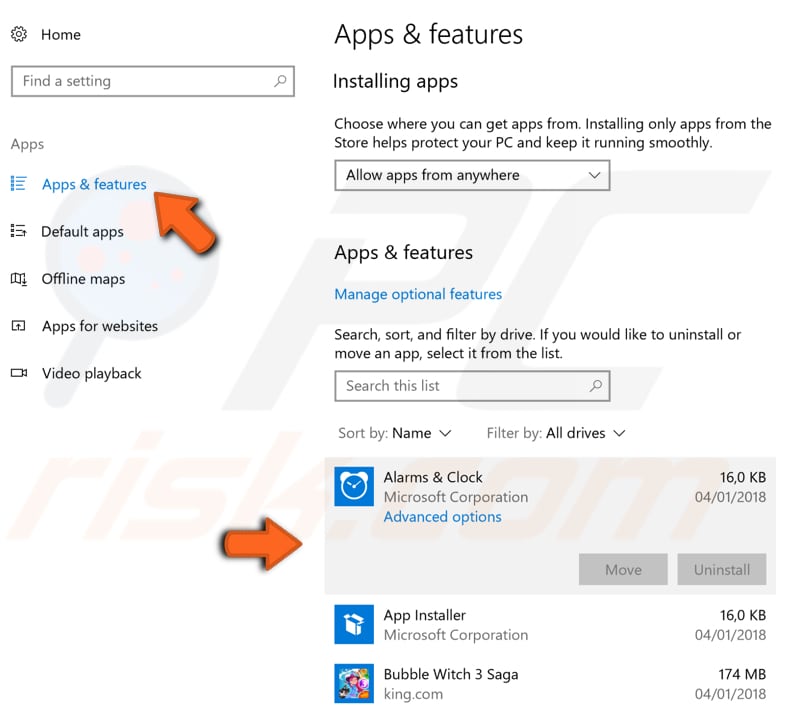
In the Apps window, look for the ESET Smart Security (or another antivirus you have installed on your PC) app under "Apps & Features," click it and select "Uninstall." If you have many apps installed, type an app name to quickly find it in the list.
Not being able to connect to the Internet and receiving the "Can't connect to this network" error can be a major problem for many users. As mentioned before, there are many reasons why this might happen, but we hope that the solutions provided in this article helped fix the problem.

▼ Show Discussion